How to wipe a hard drive on Windows + Mac devices


How to wipe a hard drive on Windows
You can wipe a hard drive on Windows 10 or Windows 11 without any third-party tools or complicated procedures. Whether you want to know how to completely wipe a hard drive because you’re getting rid of your PC, trying to boost performance, or looking to free up storage space, follow the steps below to do so safely and securely.
And always make sure to back up any critical files before wiping your hard drive on Windows. Once your hard drive has been erased, you won’t be able to retrieve your data.
Windows 11
Here’s how to erase a hard drive on Windows 11:
1. Go to Settings and select System from the left panel. Select Recovery from the System menu.
2. In the Recovery menu, find Reset this PC under Recovery options. Click the Reset PC button on the right side.
3. Next, you’ll be asked what you want to erase. Select Remove everything, and then choose whether you’d like to perform a Local reinstall or a Cloud download to reinstall Windows.
4. In the next window, select Yes under Clean data? and (if you plan to keep your computer) under Download Windows? Click Confirm and Reset to wipe your PC’s hard drive.
Windows 10
Wiping a hard drive on Windows 10 is like doing it on Windows 11. There are just a few small differences. Here’s how to clear a hard drive on Windows 10:
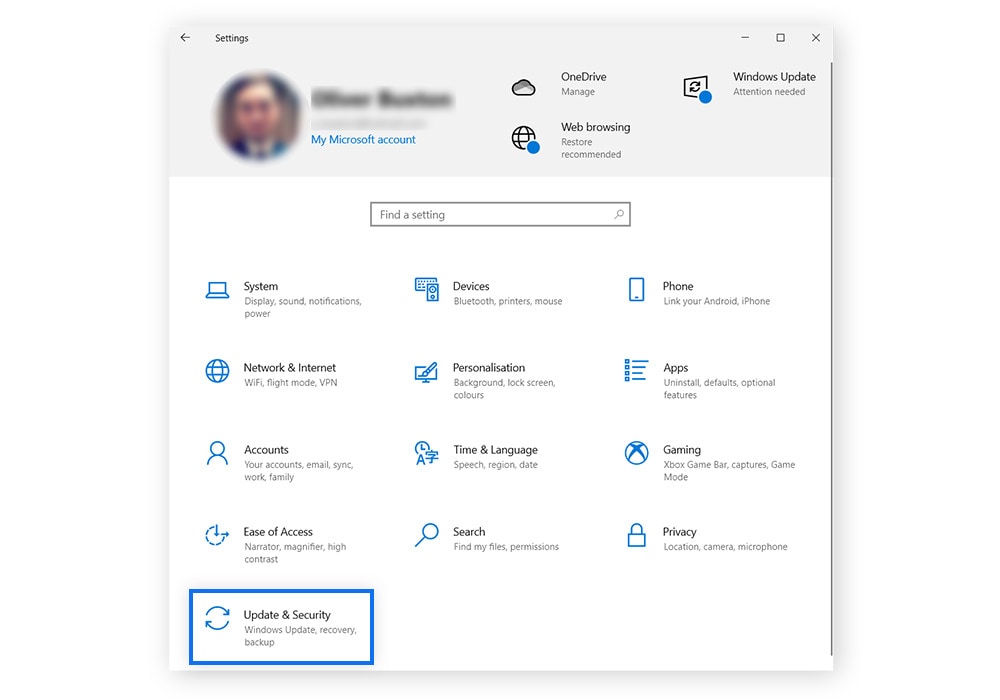
1. Open the Settings menu and click Update & Security.
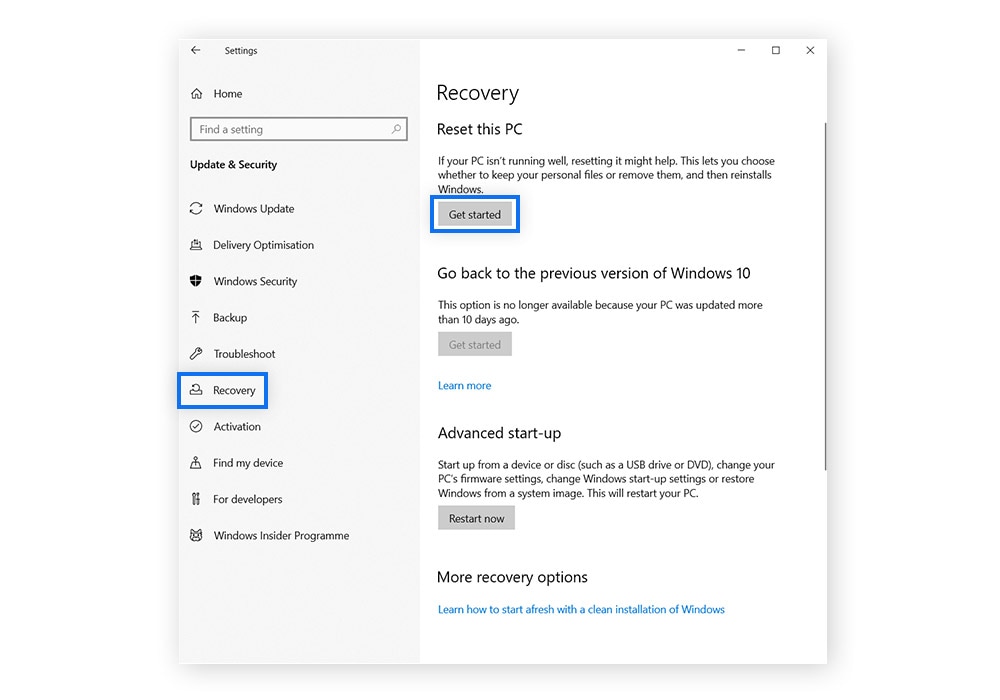
2. Select Recovery in the left menu, then click Get Started under Reset this PC.
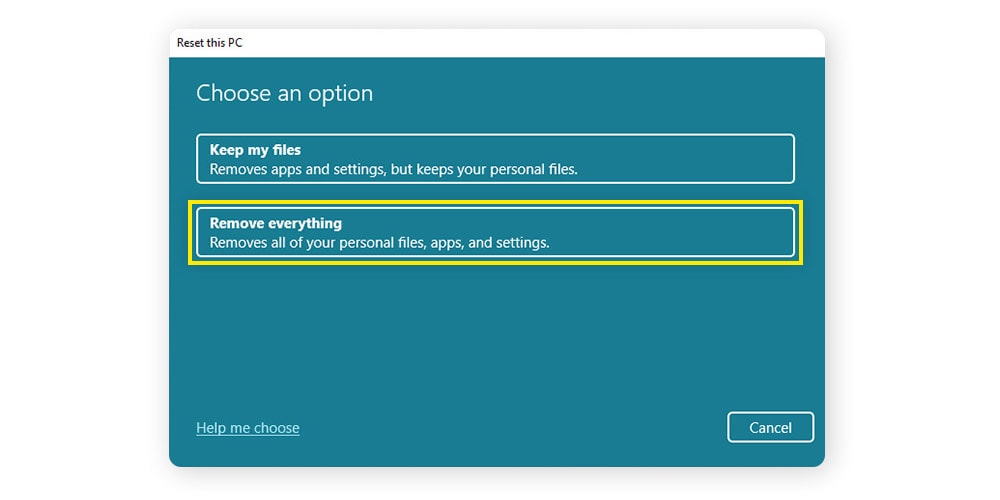
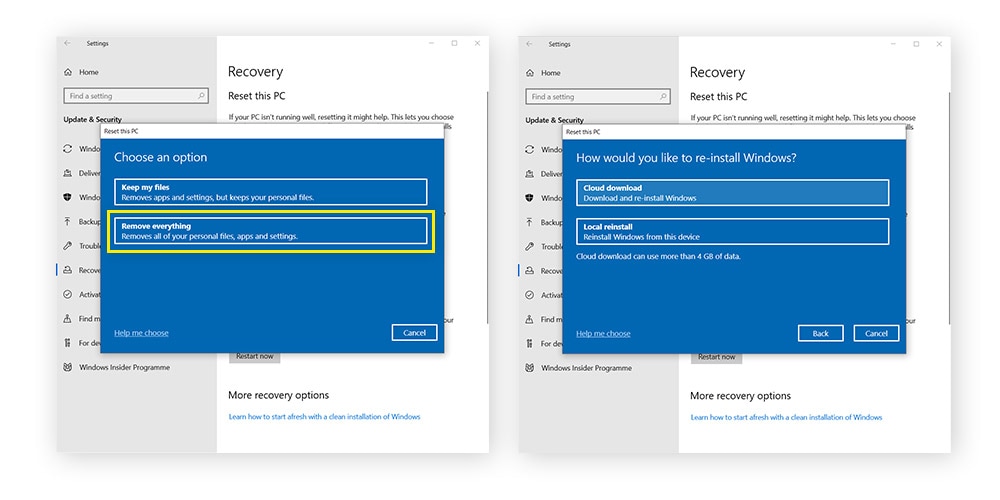
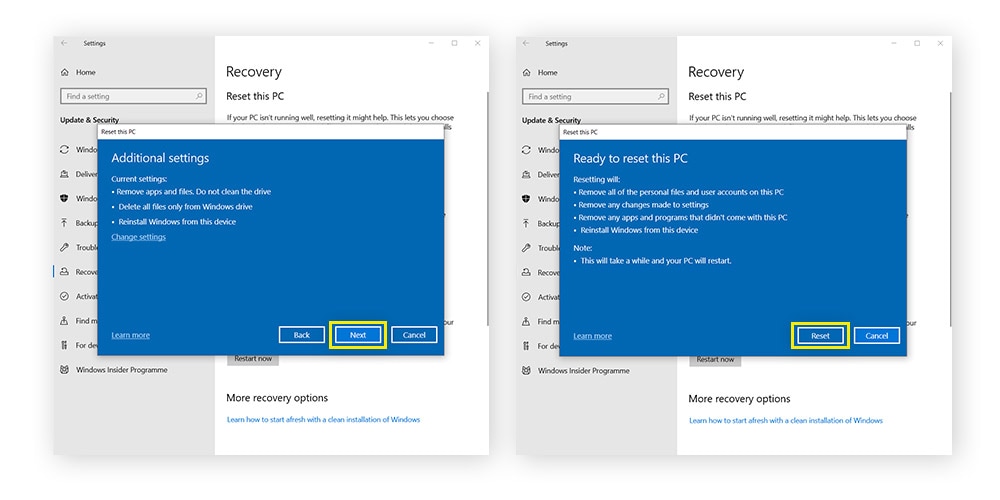
3. Click Remove everything and select whether you’d like to perform a Local reinstall or a Cloud download to reinstall Windows on your wiped device.
4. Click Next to confirm your preferences. Once you’re sure you’ve backed up anything you may need, and you’re ready to wipe your hard drive, click Reset.
External drives on Windows
There are several ways to wipe an external Windows hard drive. The following instructions explain how to wipe an external hard drive using Disk Management on Windows. For more options, check out the third-party tools listed later in this article.
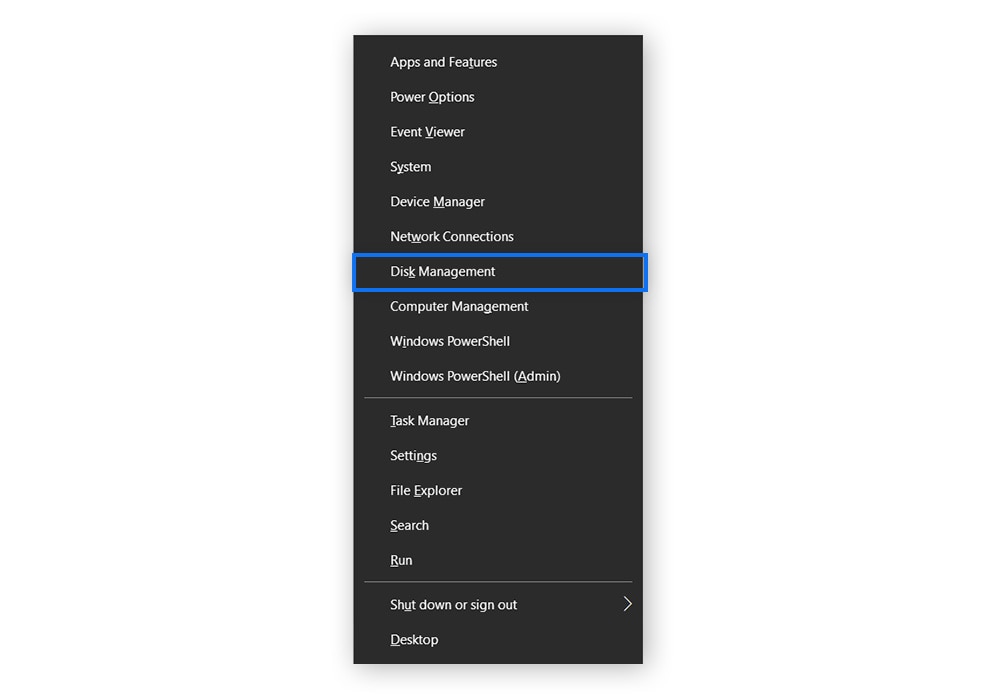
1. Connect your external hard drive to your computer, press the Windows key + X on your keyboard, and select Disk Management from the pop-up menu.
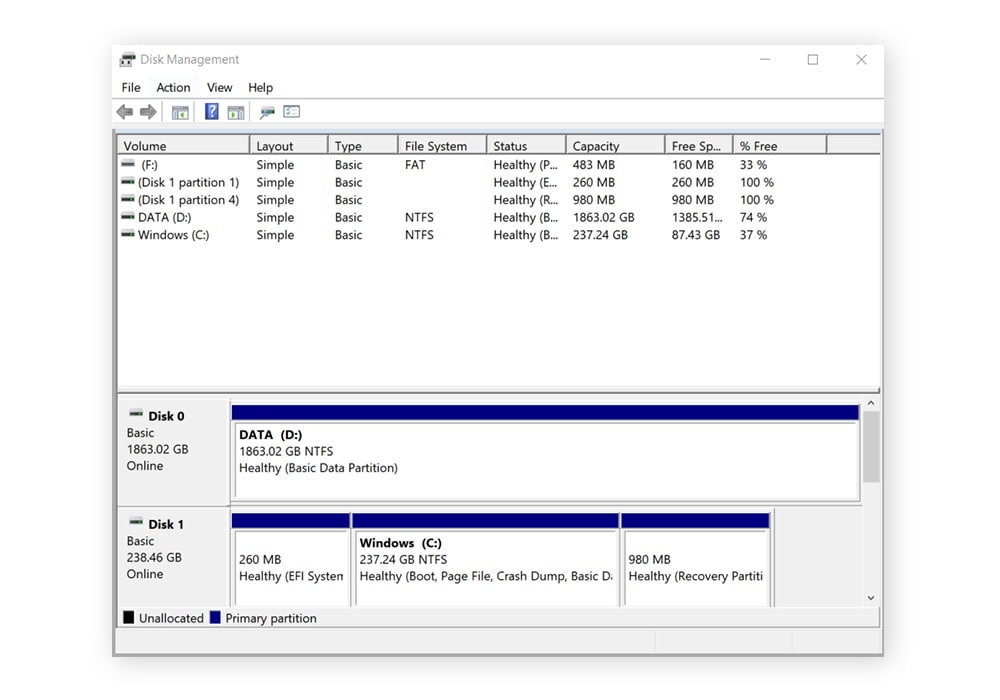
2. In the next menu, you’ll see a list of your hard drives. Right-click the external drive in the column titled Volume. Then, select Format. Click Yes in the next pop-up window.
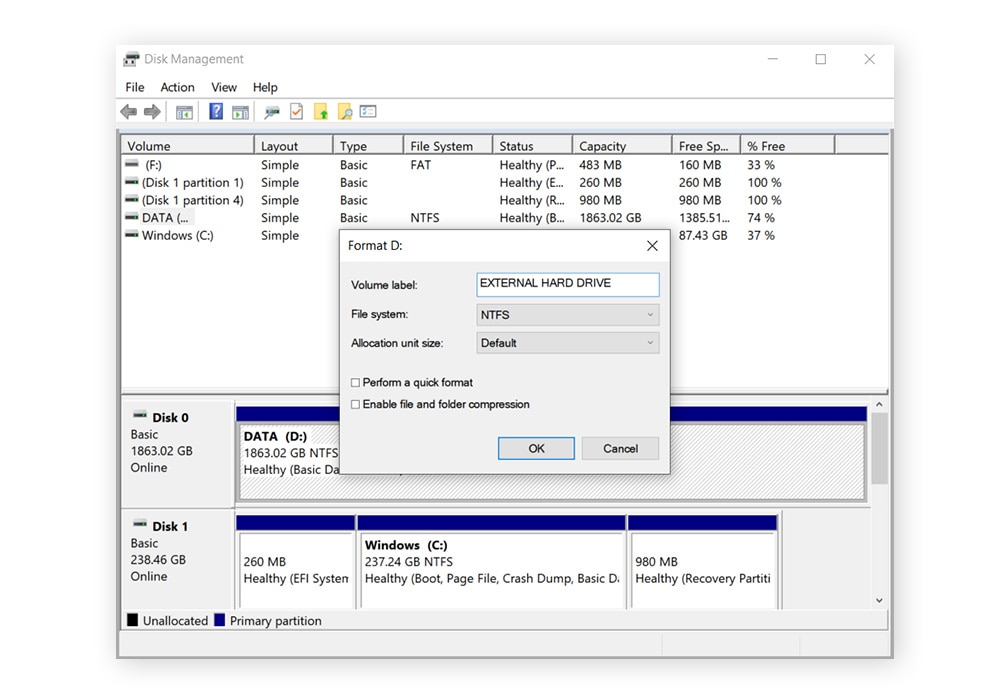
3. In the Format D: window, uncheck the box titled Perform a quick format and click OK. Click OK again in the next pop-up window to begin the hard drive wipe.
How to wipe a hard drive on MacOS
Wiping hard drives on Mac is easy, but it depends on what type of Mac — and what type of hard drive — you have. If you don’t know which type of Mac you have, you can find out by clicking the Apple menu at the top left of your screen and selecting About this Mac.
And, of course, don’t forget to back up any apps or files you need before wiping your hard drives. Once you erase your hard drive on Mac, your data will be gone for good.
Devices with a silicon chip
MacBook Pro, MacBook Air, iMac, and Mac Mini computers manufactured from late 2020 and after contain Apple silicon chips (M1, M2, or M3 processors). Here’s how to wipe a silicon chip hard drive:
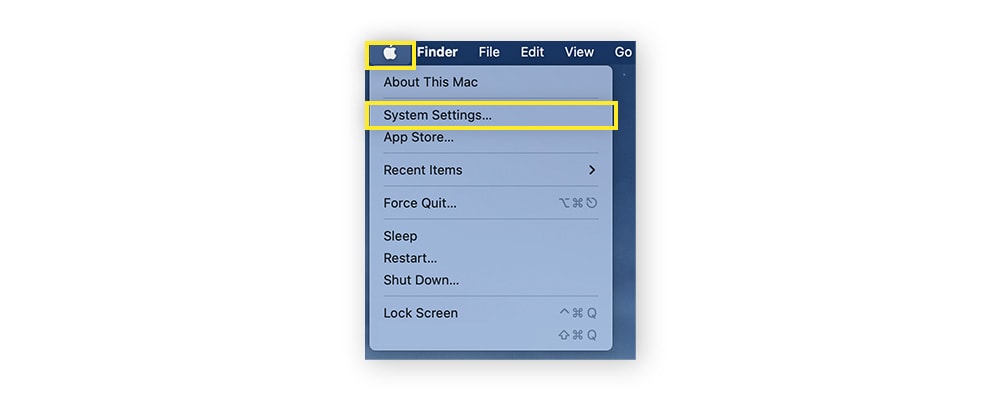
1. Click the Apple menu in the top-left corner of the screen and select System Settings.
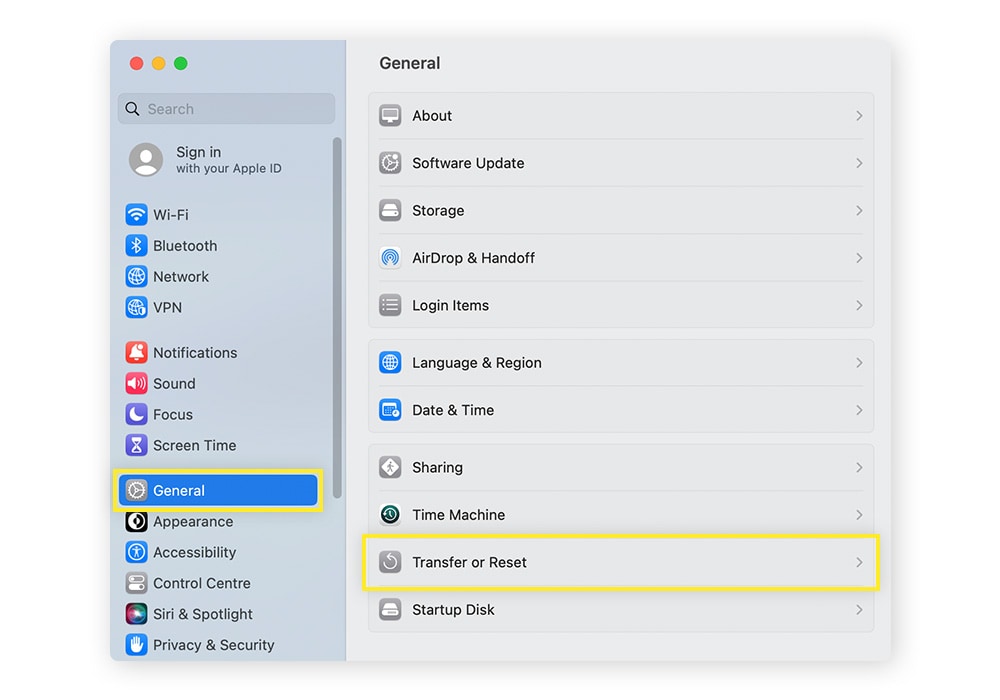
2. Click on General on the System Settings sidebar and select Transfer or Reset.
3. Click Erase All Content and Settings.
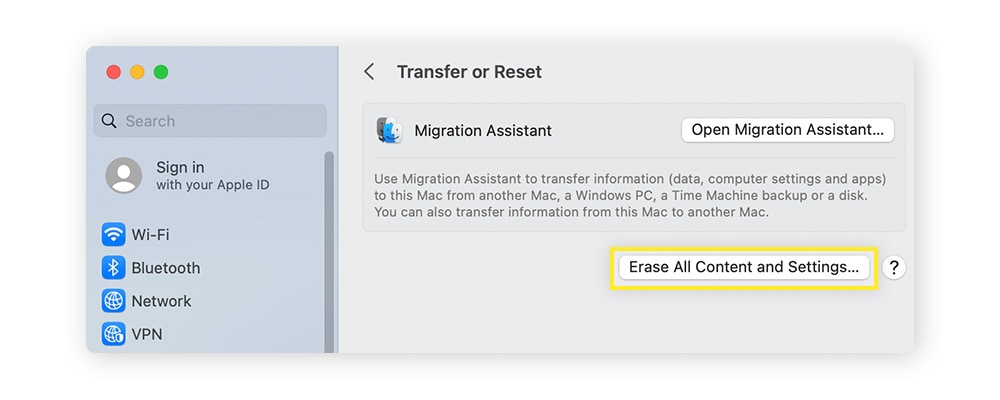
The “erase assistant” wizard will then open. Simply follow the on-screen instructions to erase your Mac’s disk. Your Mac will then restart and reactivate, and a “setup assistant” will guide you through reactivating it.
If you want to sell or dispose of your Mac in an “out-of-box” state, don’t reactivate it — just power off the device after it restarts.
Devices with Intel processors
If your Mac was manufactured before 2020, it probably has an Intel processor. Here’s how to use Disk Utility to erase an Intel-Mac hard drive:
1. Shut your Mac down and reboot it. As soon as it powers on hold the Command (⌘) + R keys simultaneously until you see the Apple logo.
2. Next, you may need to enter your password if your computer requires users to log in.
3. If you’ve rebooted correctly, you should see the Utilities Window. Select Disk Utility and click Continue.
4. In the side panel, select Macintosh HD under Internal (if you changed your hard drive’s name, it will appear by its name and not Macintosh HD).
5. Click Erase in the toolbar at the top of the window. In the pop-up window, confirm that the name of the drive is Macintosh HD (or whatever you changed the hard drive’s name to) and select APFS under the Format dropdown menu. Click Erase.
6. You may need to enter your Apple ID in a pop-up window to confirm the action.
7. Quit Disk Utility to return to the Utilities Window. If you plan to keep your Mac, select Reinstall macOS and click Continue. If you don’t, you can shut the computer down once formatting is complete.
Devices with a solid-state drive (SSD)
SSD hard drives are difficult to erase entirely. That means that if you wipe a computer hard drive using the process described above, your files may still be accessible. To completely wipe your SSD hard drive, you need to encrypt its contents first.
Here’s how to encrypt and permanently wipe a Mac SSD hard drive:
1. Click the Apple logo at the top left of your screen and select System Preferences. Click Security & Privacy and select FileVault from the top of the window.
2. Enable FileVault to encrypt your hard drive. You’ll receive a password, so write it down and keep it handy. Encrypting your hard drive will likely take several hours.
3. When the encryption is complete, reboot your Mac and hold the Command (⌘) + R keys during startup.
4. Select Disk Utility from the Utilities Window.
5. Choose the SSD hard drive from the sidebar. Because you encrypted your drive, you’ll need to select Unlock from the File menu and enter the password you received in step 2.
6. Click Erase in the toolbar at the top of the window. In the pop-up window, confirm that the name of the drive is Macintosh HD (or whatever you changed the hard drive’s name to) and select APFS under the Format dropdown menu. Then click Erase again.
7. You may need to enter your Apple ID in a pop-up window to confirm the action.
8. Any residual data left on your hard drive is now permanently encrypted, so you can safely donate or sell your device.
Not sure if your Mac has an SSD drive? Click the Apple logo in the top left of your screen and select About this Mac. Click Storage to view your hard drive. If you see the words “Flash storage” under the hard drive logo, it means you have an SSD hard drive.
External drives on MacOS
Wiping an external hard drive, or other external drives such as USB sticks, is easy to do on Mac. Just make sure you back up your files first. Here’s how to wipe an external hard drive on Mac computers.
1. Open any file on your Mac and click Applications on the sidebar.
2. Open the Utilities folder and double-click Disk Utility.
3. At the top of the window, next to the words Disk Utility, click View and select Show All Devices.
4. Select your external hard drive from the sidebar. It should appear under the External section.
5. Click Erase in the toolbar at the top of the window. In the pop-up window, confirm the external hard drive's name and select APFS under the Format dropdown menu. Under the Scheme menu, select GUID Partition Map.
6. Click the Erase button. You may need to enter your Apple ID in a pop-up window to confirm the action.
7. Once the wipe is finished, click Done and quit Disk Utility.
How to wipe a hard drive on a non-working computer
If you can’t boot up your computer, you’ll need to physically destroy the hard disk(s) inside (also called the drive platter) to ensure no one can access your data. Here are a few ways to do it:
- Drill holes in the hard drive: This is a decent way to destroy a hard drive, but make sure to remove it from the computer first and to drill multiple holes. Hackers may be able to extract data from undamaged parts of the drive.
- Shred the hard drive: This will completely destroy your hard drive, but you can’t do this at home. You’ll need to send your hard drive to a company that specializes in electronics disposal.
- Take apart the hard drive: Disassembling your hard drive with a screwdriver will separate its electronic components, rendering it unreadable. Next, you’ll need to destroy the disk itself with shears or a hammer to destroy the data within it.
- Degauss the hard drive: Degaussing removes magnetic fields from storage devices. You can buy a degaussing wand for about $20. To erase your hard drive, remove the drive platter and pass the degausser over it for about a minute. Be careful not to use the wand around other electronics.
How to wipe a hard drive using third-party tools
Wiping your hard drive and backing up your files can be a stressful process. If you make a mistake, you could permanently lose valuable data. Using a third-party tool can simplify the process and help safeguard your important files.
Here are some of the most popular third-party tools for wiping your hard drive:
- Norton Utilities Ultimate: This comprehensive PC cleaner is ideal for clearing storage, removing junk, and boosting performance. Norton Utilities Ultimate is available for Windows operating systems and can also wipe system and external hard drives with its Drive Shredder tool — simply select your wiping option and reboot your computer to erase your hard drive and make your data virtually impossible to recover.
- CCleaner: A program optimized for cleaning up your hard drive to free up storage space, CCleaner can also be used to wipe hard drives clean. CCleaner works from within your operating system, making it easy to navigate. It’s compatible with Windows, macOS, and Android.
- DBAN: Darik’s Boot and Nuke (DBAN) is a hard drive wipe program you can initiate from a USB or a CD. It uses an algorithm to overwrite the data on your hard drive multiple times to help make it unrecoverable. DBAN is not always 100% effective when used on SSD hard drives.
- CBL Data Shredder: This is a tool that helps overwrite hard drives on any operating system. One of the easiest tools to use, CBL Data Shredder uses various methods to wipe a computer, helping to ensure that file recovery programs can’t retrieve your data.
- Disk Wipe: Disk wipe is an app for Windows that helps you erase your hard drive with no chance of recovery. Like DBAN, Disk Wipe overwrites your hard drive with random binary data multiple times to make old files nearly impossible to access.
- Active KillDisk Freeware: This tool uses a data erase method called One Pass Zero to replace everything on your hard drive with binary zeros, permanently erasing your data. Active KillDisk is compatible with Windows, macOS, and Linux.
- AOMEI Partition Assistant Standard: This is another storage management tool that can also be used to wipe a hard drive. AOMEI offers several simple and effective methods of erasing your data, but it’s compatible only with Windows operating systems.
Help keep your hard drive clean with Norton Utilities Ultimate
It’s risky to leave your hard drive intact when you’re donating, selling, or even junking your computer. Anyone with data recovery software may be able to access years of your personal data, including photos, financial info, and much more.
That’s why it’s a smart idea to use software that can permanently erase data when it’s time to wipe your hard drive. Norton Utilities Ultimate helps erase your data for good, so no one can get their hands on your private information. It also helps you declutter junk and organize your files and apps to keep your computer running more smoothly.
FAQs about wiping a hard drive
Can you completely wipe a hard drive?
Yes, it is possible to completely wipe a hard drive. Your computer comes with tools to help you wipe its hard drive. But it’s not always easy to do, and if your computer has an SSD hard drive, you’ll need to use encryption or perform a full format to reliably wipe it completely. Third-party tools can help you erase your hard drive more easily and securely, such as CCleaner and Norton Utilities Ultimate.
When should I wipe my hard drive?
If you’re performing computer maintenance, wiping your hard drive might help speed up your machine by removing old apps and files. Practicing good cyber hygiene can also prevent your data from being accessed by hackers or anyone else who gets their hand on your hard drive.
You should wipe your hard drive in the following situations:
- You plan to sell or donate your computer.
- You plan to throw your computer away.
- our computer is infected with malware or viruses.
- Your computer’s performance is suffering due to bloatware and junk files.
- You bought a pre-owned computer and found old files on the hard drive.
What is the best way to wipe a hard drive?
The most reliable way to wipe a hard drive is to physically destroy it. If you want to sell or continue using your computer, an alternative is to erase your hard drive from inside the operating system, but this can be slightly complicated, and you may risk losing data if you make a mistake. Third-party tools like Norton Utilities Ultimate make it easy to wipe your hard drive and protect your data.
What are the risks of not wiping my hard drive?
When you sell or even throw away a computer, if you don’t properly wipe your hard drive, deleted data can be retrieved and fall into the wrong hands. This includes your photos, documents, financial information, passwords, and anything else stored inside. This can lead to identity theft and other devastating, long-term consequences.
What are the different types of data deletion?
There are many ways to wipe a hard drive — some more secure than others. The main types of secure data deletion are wiping, degaussing, and shredding. Wiping involves overwriting data with random patterns, whereas degaussing applies a high-frequency magnetic field to destroy data on magnetic media. Shredding either physically or digitally cuts media into small pieces, rendering it irretrievable.
Editorial note: Our articles provide educational information for you. Our offerings may not cover or protect against every type of crime, fraud, or threat we write about. Our goal is to increase awareness about Cyber Safety. Please review complete Terms during enrollment or setup. Remember that no one can prevent all identity theft or cybercrime, and that LifeLock does not monitor all transactions at all businesses. The Norton and LifeLock brands are part of Gen Digital Inc.


Want more?
Follow us for all the latest news, tips, and updates.