How to password protect a folder on Windows and Mac
Protecting your folders on your computer goes beyond hiding them in your system. Often, you need to password protect particular documents containing sensitive personal information. Here, we’ll show you how to password protect a folder or individual file on Windows or Mac. Then, strengthen your device security with Norton 360 Deluxe, an easy-to-use security app that packs multiple layers of online protection.


Key takeaways
- The built-in Windows Encrypted File System (EFS) utility can help password protect a folder on some versions of Windows.
- Mac users can leverage the Disk Utility to create a password-protected disk image for confidential files.
- Third-party apps like 7-Zip and VeraCrypt can also help you encrypt folders.
How to password protect a folder
To put a password on a folder or file, you can use your operating system’s built-in features or a third-party tool like 7-Zip or VeraCrypt.
While both Windows and macOS allow you to password protect your user account, this may not be enough to keep your most personal information secure. A glance at recent password statistics makes it clear why. For example, in 2022, over 24 billion passwords were exposed by hackers.
If you think of your account password as the lock on your front door, a password-protected folder is like putting a lock on your personal diary. A hacker may be able to break into your computer, but they‘ll have a harder time accessing your sensitive information if you password protect a folder containing that data.
Dive into our guide for step-by-step instructions on how to password protect a folder.
Windows
A simple (but not the most secure) way to lock a folder in Windows is to encrypt it using the built-in Encrypted File System (EFS) utility. Encryption is a way of scrambling a folder’s contents so that they’re unreadable without a key or password. It protects your folder from being accessed from another account but it doesn’t protect you if someone has broken into your Windows account.
Note that while this EFS feature is on Windows 10 and 11, it’s not available on the Windows Home edition—only the Education, Enterprise, or Pro editions.
Here’s how to password protect a folder in Windows 10 or 11 Education, Enterprise, or Pro:
1. Find the folder or file you want to encrypt.
2. Right-click it and select Properties > Advanced.
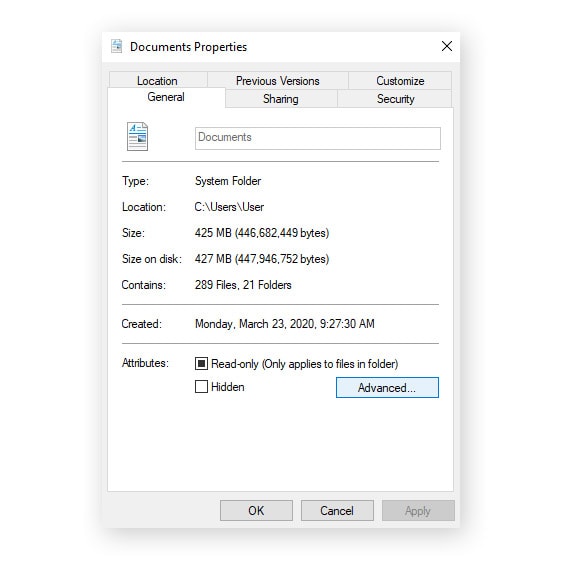
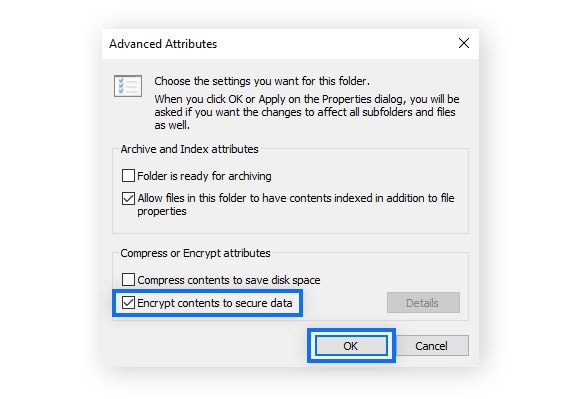
3. Check Encrypt contents to secure data > click OK.
4. You’ll be prompted to choose whether to apply changes to that folder only or the folder and its subfolders and files.
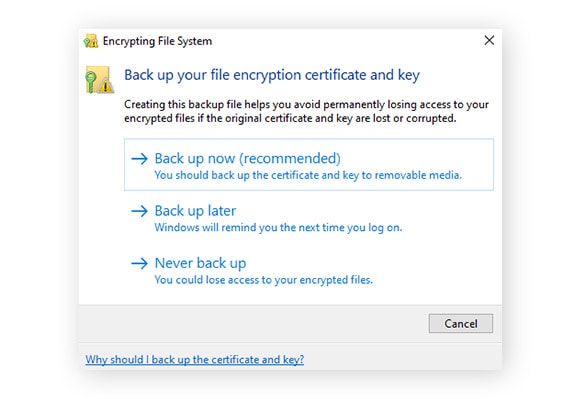
5. A pop-up message will appear offering the option to back up your encryption key—click to open it. If you don’t wish to back up, click Never back up. Otherwise, click Back up now (recommended).
If the backup prompt doesn’t appear, press Win + R on your keyboard. Type certmgr.msc and hit Enter. In the left pane, expand Personal and open Certificates. Under the Intended Purposes column, it should say Encrypting File System. Right-click your certificate, then choose All Tasks and select Export.
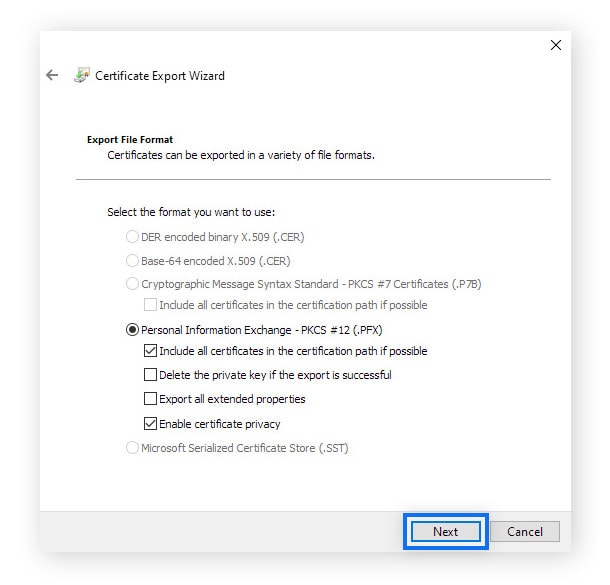
6. In the Certificate Export Wizard, click Next and Next again without changing any options. Check that what you see on your screen matches the screenshot below.
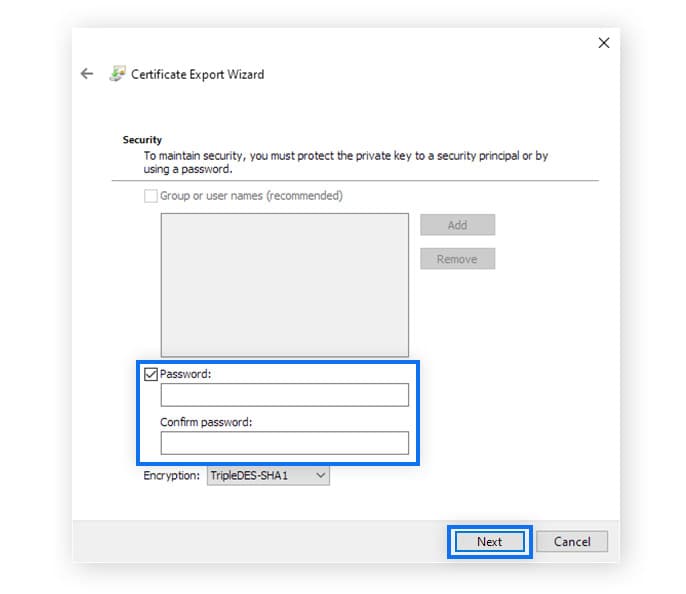
7. Check the box next to Password. Enter the password you want to use to protect this encryption key backup, then click Next.
8. Name the file, then click Next > Finish > OK.
Mac
A simple way to lock a folder on your Mac computer is to use the macOS built-in Disk Utility. This method involves creating a disk image that acts as a container for the files you want to protect, rather than directly creating a password-protected folder. Each time you want to access the contents of the disk image, you’ll need to enter a password. While it’s not the same as password protecting a folder, it achieves a similar level of security.
Here’s how to add a password to a folder on your Mac:
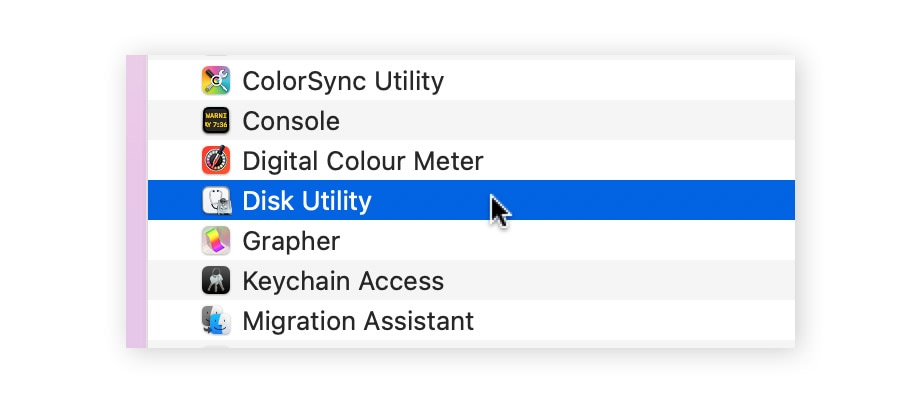
1. Open a new Finder window, then go to Applications > Utilities > Disk Utility.
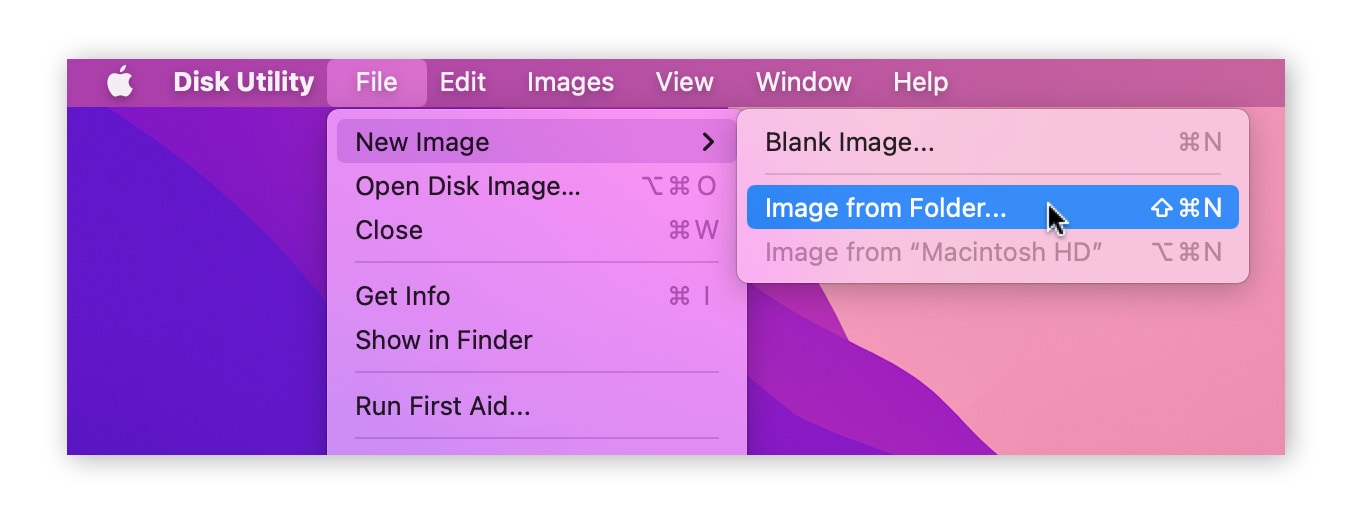
2. From the File menu, choose New Image > Image from Folder.
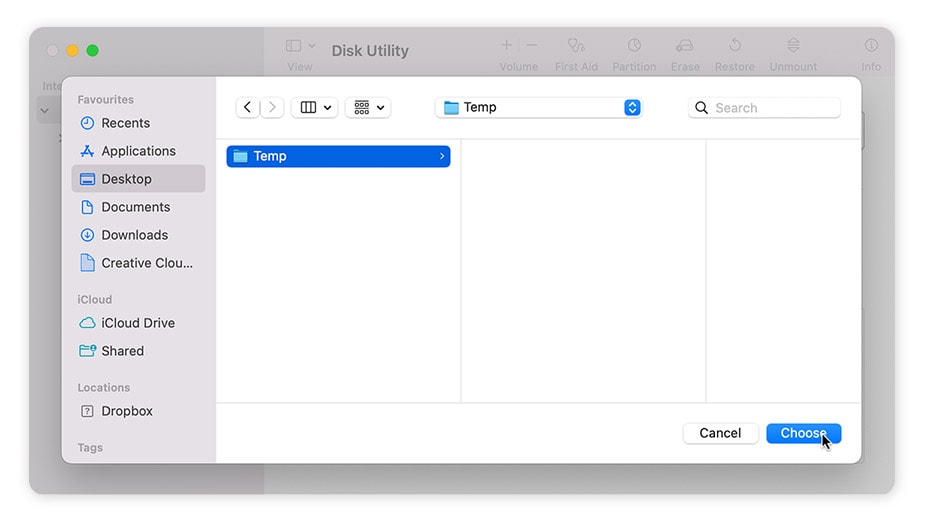
3. Pick the folder you want to password protect and click Choose.
4. Now set the options and format for your disk image:
• Choose a name for your disk image and select where you want to save it.
• Expand Image Format and choose read/write to ensure you can remove or add items to this folder later if you need to.
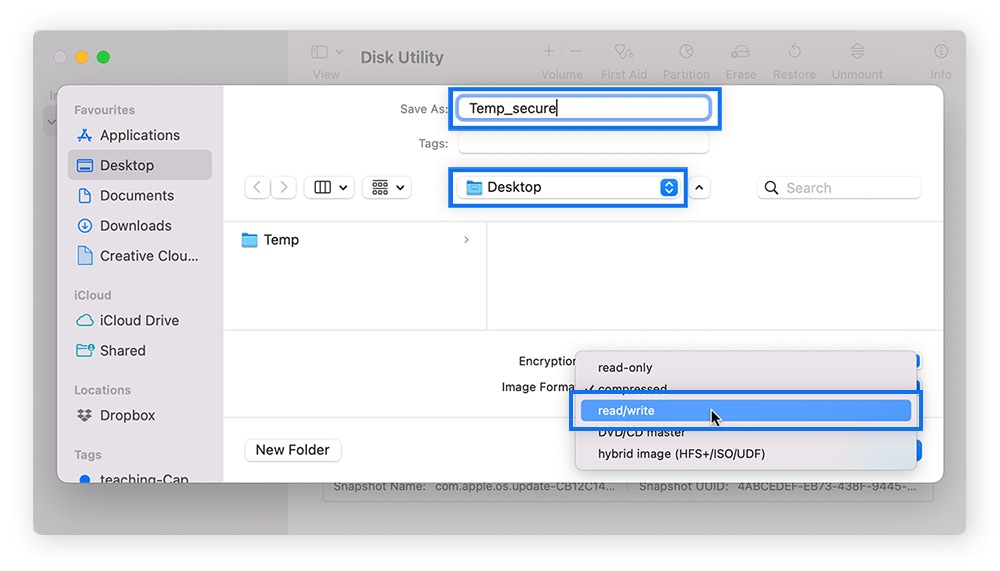
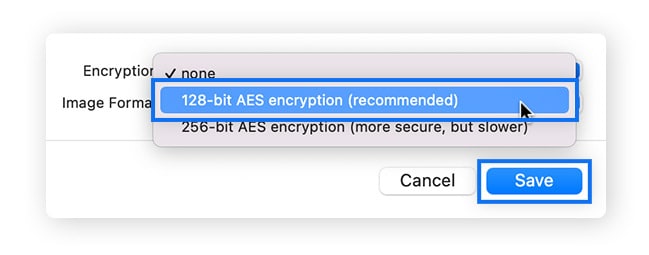
• Set the encryption to "128-bit" or "256-bit" for security and click Save.
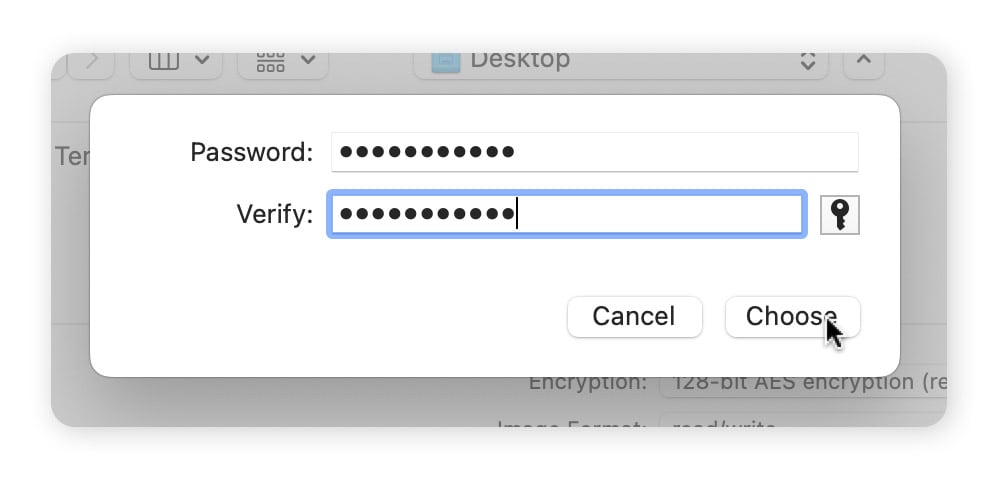
• Enter the password you want to use to unlock the disk image and click Choose.
5. Wait while Disk Utility encrypts your folder. It will create a .dmg file, which is the disk image. When it’s finished click the blue Done button.
6. If you don’t need the original unencrypted folder, you can delete it.
To open password-protected folders on your Mac, double-click the relevant .dmg file and type in the password. The disk image will mount, allowing you to access, add, or remove files.
7-Zip
7-Zip is free, open-source software and its strong encryption options make it an excellent choice for creating a locked folder on your Windows computer (Macs can use VeraCrypt).
Your files are compressed and encrypted, so when you need to access them, you need to decompress the file first. While this is an extra step, it’s well worth the added security.
Here’s how to put a password on a folder using 7-Zip:
1. Start by downloading 7-Zip from the official website: https://www.7-zip.org. Follow the installation prompts to set it up on your computer.
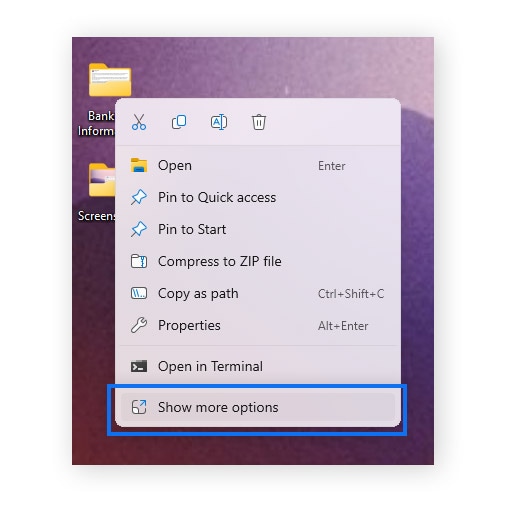
2. Locate and right-click the folder you want to protect, then select Show more options.
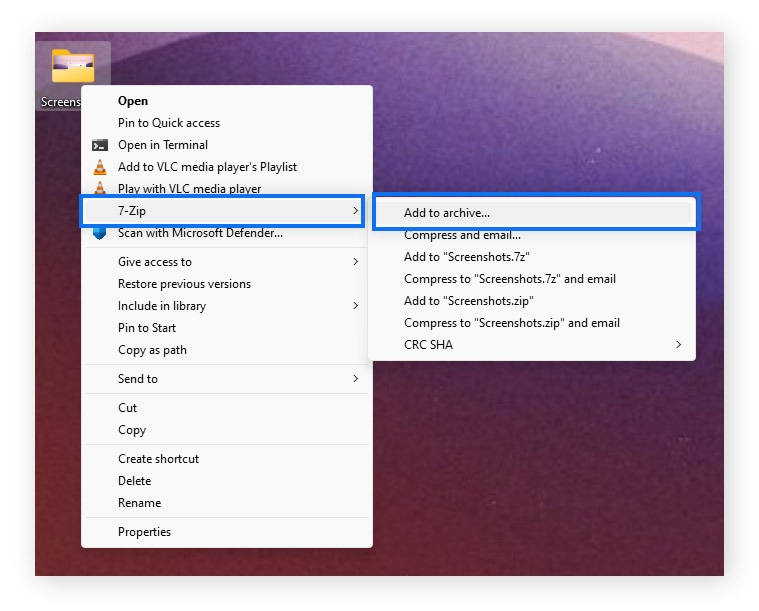
3. Click 7-Zip and select Add to archive. This will open a new window.
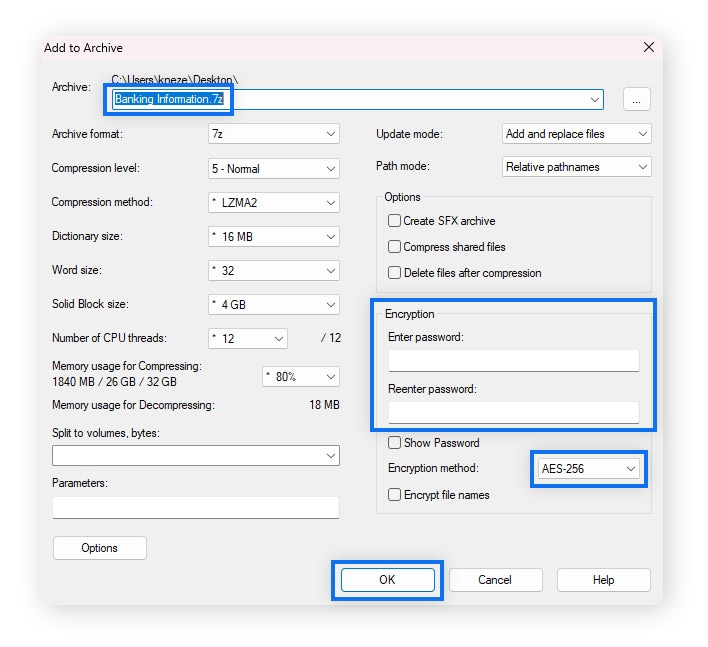
4. In the new window, you can set the archive name and format (see image below).
• Choose a name for your folder or keep the existing name.
• Under Encryption, type in a secure folder password and confirm.
• Set your encryption method (we recommend AES-256).
• Click OK.
7-Zip will compress your folder, applying the password protection in the process. This might take a moment, depending on the folder's size. When it’s complete, you’ll find a zipped version of the folder on your desktop. To access the folder's contents, you’ll need to enter the password you set during the encryption process.
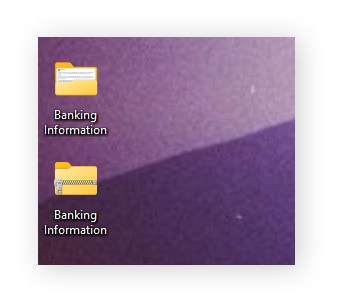
Keep in mind that 7-Zip creates an encrypted copy of your files and folders. That means the original unencrypted version will remain on your computer unless you delete or move it.
VeraCrypt
VeraCrypt is powerful, free, open-source software you can use to encrypt entire sections of your hard drive or just individual folders. As a popular tool among data security professionals, VeraCrypt provides robust protection, making it extremely difficult for an unauthorized person to access your files. Along with strong security features, VeraCrypt also has a user-friendly interface that’s great for non-professionals.
Here’s how to set a password on a folder on Windows or Mac using VeraCrypt:
1. Download and install the suitable version of VeraCrypt (it’s available for most operating systems).
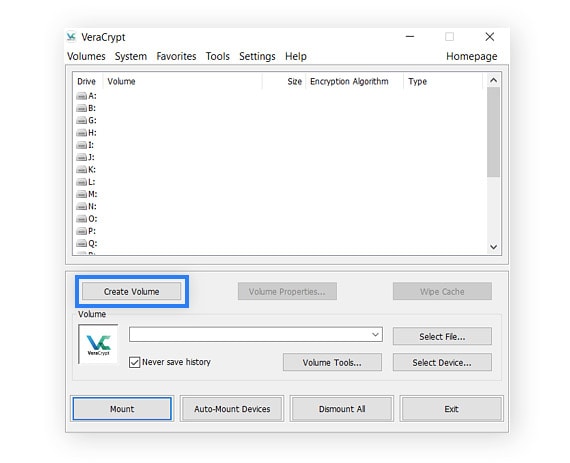
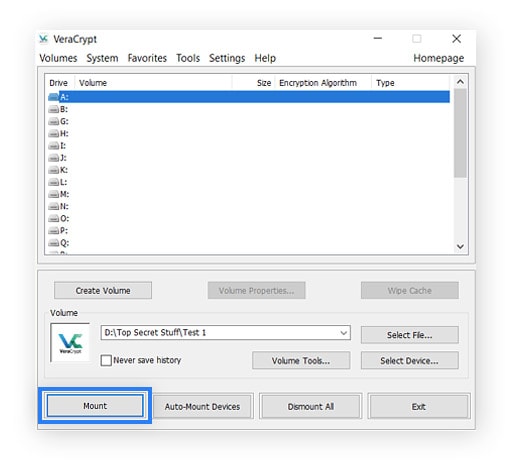
2. When you first open VeraCrypt, a window like the one in the screenshot below should pop up. Encrypted folders in VeraCrypt are referred to as “Volumes.” Click Create Volume to begin creating your first locked folder.
3. The Volume Creation Wizard will now appear. Choose Create an encrypted file container and click Next.

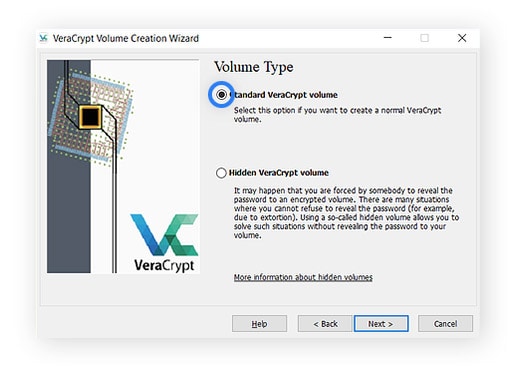
4. Choose between creating a standard volume or a hidden one. Unless you need the added protection, select the Standard VeraCrypt volume (default) and click Next.
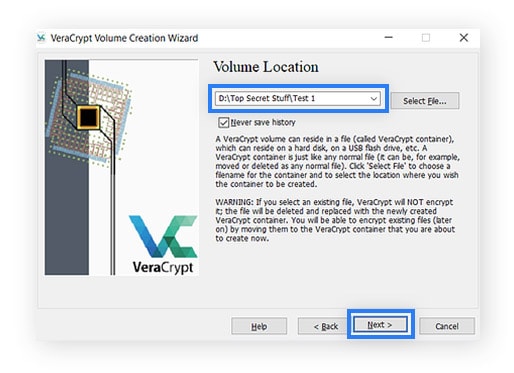
5. Next, you need to select a “container” to store your volume. Do not choose an existing file or folder as it will be overwritten—VeraCrypt will encrypt existing files later when you move them to this blank volume you’re creating now. Click Select File, choose where you want to store your locked folder, and click Next.
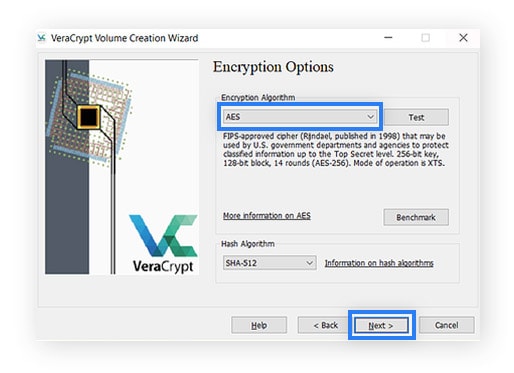
6. Now you’ll be asked to select an encryption algorithm and a hash algorithm. If you are not sure what to choose, leave the default settings and click Next.
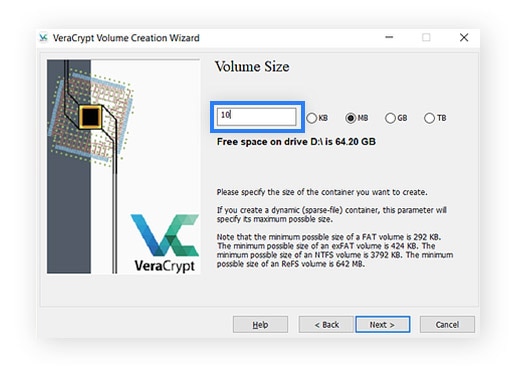
7. The next step is to choose the size of your VeraCrypt volume based on the size of the folder/s or file/s you want to encrypt and store in it. You can’t go back and extend the size later, so give yourself leeway if you’ll be storing multiple files and folders in your VeraCrypt volume. Enter your desired size and click Next.
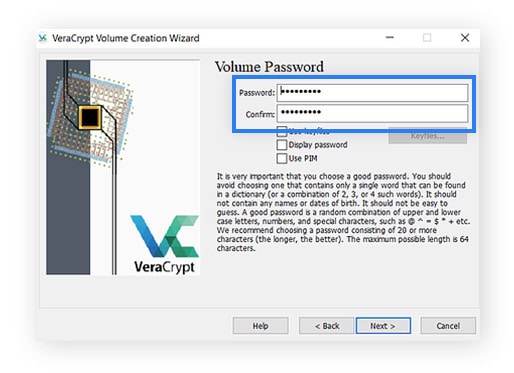
8. Now create a strong password for your locked folder. Type in your chosen password, then retype it to confirm and click Next.
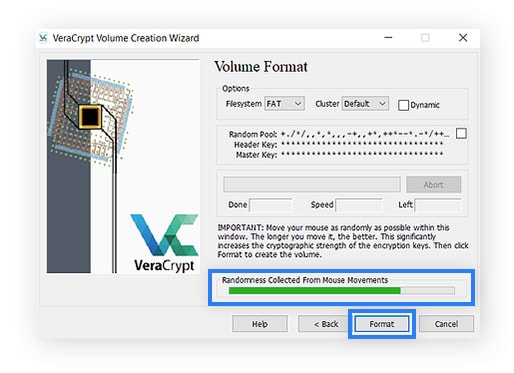
9. Your volume will now be created. You will be prompted to move your mouse around as the program uses this movement to generate an encryption key. The more random your movements, and the longer you move your mouse, the stronger the key.
Move your mouse until the bar turns green, but ideally at least 30 seconds. Click Format to finish creating your encrypted volume.
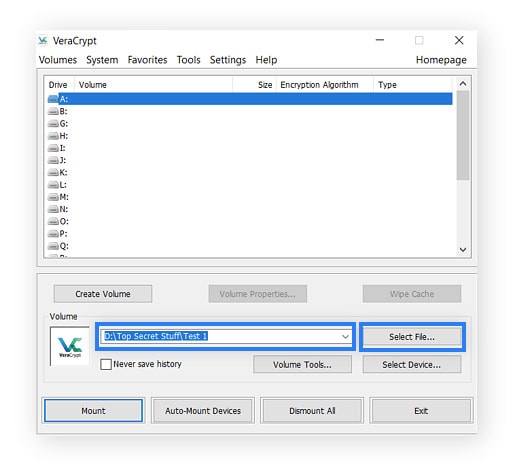
You’ll find the volume where you chose to save it. Before you can start moving folders or files into it, you need to mount the volume (set it up as a drive).
10. Select a drive letter in your highlighted volume name > click Select file.
11. Find the volume you just created and click Open.

12. Click Mount on the bottom left, then enter your password and click OK.
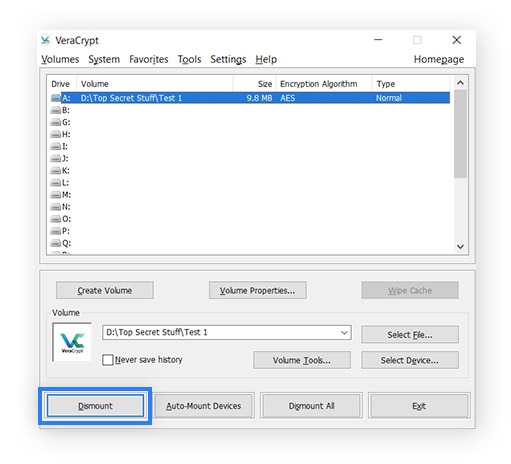
13. Double-click the mounted drive to open it in another window. Now you can move folders and files into it. Make sure you click Dismount when you’re done.
How to password protect an individual file
You can also password protect individual files in different formats like PDFs, Zip files, Excel files, and Word documents. This adds security to just that one file instead of a whole folder and the procedures are generally simpler.
Here’s how to password protect documents in various formats:
To password protect a PDF in Adobe Acrobat, you’ll need a (paid) Pro account, but the process is simple.
1. Open the PDF file in Adobe Acrobat and choose Tools > Protect.
2. Choose either to restrict editing or encrypt the file with a password.
3. Enter and confirm a password > click OK > Save.
If you don’t have a paid Adobe Acrobat account, you can use Adobe’s free online tool to password protect your PDF.
Zip file
To password protect a Zip file with built-in Windows tools, you’ll need to have the Education, Enterprise, or Pro editions.
1. Right-click the Zip file, then click Properties > Advanced.
2. Check the box next to Encrypt contents to secure data box > click Apply.
3. Choose which ZIP file elements to encrypt.
4. Click the notification about backing up your encryption key and choose Back up now.
5. In the Certificate Export Wizard, click Next twice.
5. Enter a password for the ZIP file then confirm it.
6. Name the file and choose a location, then click Finish.
Excel file
You can easily password protect a file in Excel, even if you only have the Home edition of Windows.
1. Open the Excel file you want to protect.
2. Go to File and select Info.
3. Click Protect Workbook and choose Encrypt with Password.
4. Enter a strong password and click OK. Enter it again and click OK once more.
5. Save the file.
Word document
To password protect a file in Microsoft Word:
1. Open the Word document you want to protect.
2. Go to File and select Info.
3. Click Protect Document and choose Encrypt with Password.
4. Enter a strong password and click OK. Enter it again and click OK once more.
5. Save the file.
Tips for keeping your files safe
In addition to password protecting your files and folders, there are several other important steps you can take to enhance the security of your digital data. Here are some key tips for keeping your files safer:
• Regularly back up your data: Back up data regularly using an external hard drive or cloud storage to ensure you can recover your data if it’s lost or compromised.
• Use strong passwords: Boost your password security by using strong unique passwords. Always use a mix of uppercase and lowercase letters, numbers, and symbols, and never use personal information like your birth date.
• Use a password manager: To keep track of all your complex passwords, store passwords in a password manager. These tools can also generate strong passwords for you.
• Lock your devices: Setting up a password, PIN, or biometric lock on all your devices puts up an additional barrier between you and a potential hacker.
• Follow cybersecurity best practices: Stay on top of the latest cybersecurity basics to help protect your data effectively.
• Use antivirus software: Install reputable antivirus software to help protect your devices against malware like viruses that could compromise your data security.
Help secure your device with Norton 360 Deluxe
The data security world is vast and complex. While safeguarding your sensitive data with strong passwords is vital for online safety, some aspects of data security are best left to experts.
For comprehensive protection, consider Norton 360 Deluxe. This all-in-one security solution offers real-time antivirus and malware protection as well as features like a secure VPN and a password manager, helping you more confidently manage the complexities of data security.
FAQs about password protecting a folder
Have more questions about how to lock a folder on your Windows or Mac computer? Here are some folder protection FAQs and answers.
Can I hide a folder?
You can hide a folder several ways on Windows or Mac. Some of the easiest methods are using keyboard shortcuts, File Explorer (Windows), or third-party apps. However, learning how to show hidden files on Mac is essential if you want to access them later, as merely hiding a folder won’t provide robust security.
Why can’t I password protect my folder?
It may be due to limitations in your operating system or the file type. For example, the Home edition of Windows doesn’t have a built-in tool for encrypting a folder. Consider using third-party software like VeraCrypt or 7-Zip.
What is the difference between encrypting and password protecting a folder?
Encrypting a folder scrambles its contents, making it unreadable without the correct decryption key. Password protection only requires a password for access but doesn't alter the contents.
Should I password protect my folders?
It’s a good idea to password protect sensitive folders to prevent unauthorized access. This includes folders that contain important, confidential, or personal information like financial documents, family photos, work-related files, or any other data that you consider private or valuable.
Editors’ note: Our articles offer educational information and are written to raise awareness about important topics in Cyber Safety. Norton products and services may not protect against every type of threat, fraud, or crime we write about. For more details about how we research, write, and review our articles, see our Editorial Policy.


Want more?
Follow us for all the latest news, tips, and updates.