How to scan and repair hard disk issues with the CHKDSK command
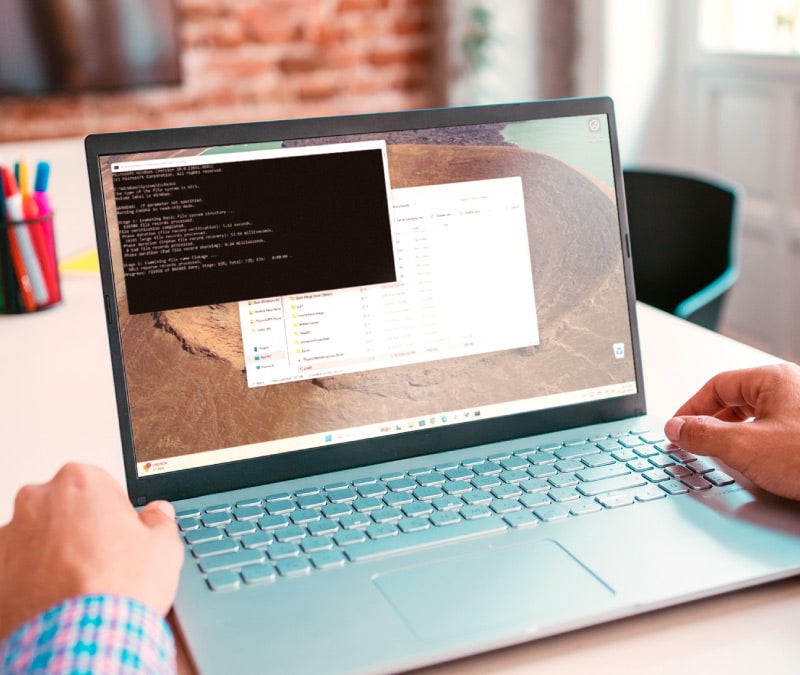
The CHKDSK command is a built-in utility that helps Windows users fix corrupted files and prevent system slowdowns. Learn how to run it to improve your PC’s stability. Then, keep your computer running smoothly with user-friendly performance optimization software that helps get rid of system junk and free up space.

2025
Consumer
Security Innovator

What is the CHKDSK command?
The CHKDSK command, short for “check disk,” is a Windows tool that scans for and repairs file system errors and checks for hard drive integrity issues. It detects and fixes corrupted files, identifies hard drive failures, and helps prevent data loss by ensuring your disk is functioning properly.
How to run CHKDSK on Windows 11
You can run CHKDSK from Windows File Explorer and through Command Prompt. While the File Explorer option is simpler, running CHKDSK via Command Prompt lets you use more advanced commands, allowing you to automatically fix errors, scan for bad sectors, and repair disk corruption.
How to run CHKDSK from File Explorer
You can run CHKDSK from Windows File Explorer by using the Error Checking tool in your hard drive’s properties.
Here’s how to run CHKDSK from File Explorer:
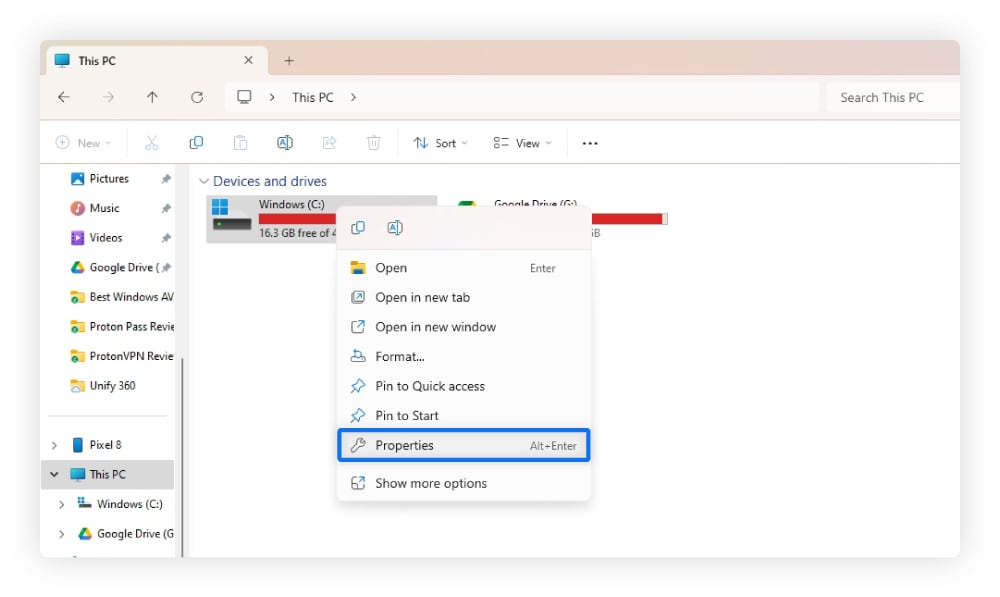
- Open File Explorer by clicking the folder icon on your taskbar and go to This PC.
- Right-click on the hard drive you want to check in the Devices and drives section.
- Select Properties in the drop-down menu and open Tools from the tabs at the top.
4. Click Check next to Error Checking and wait to see if your computer identifies any errors.
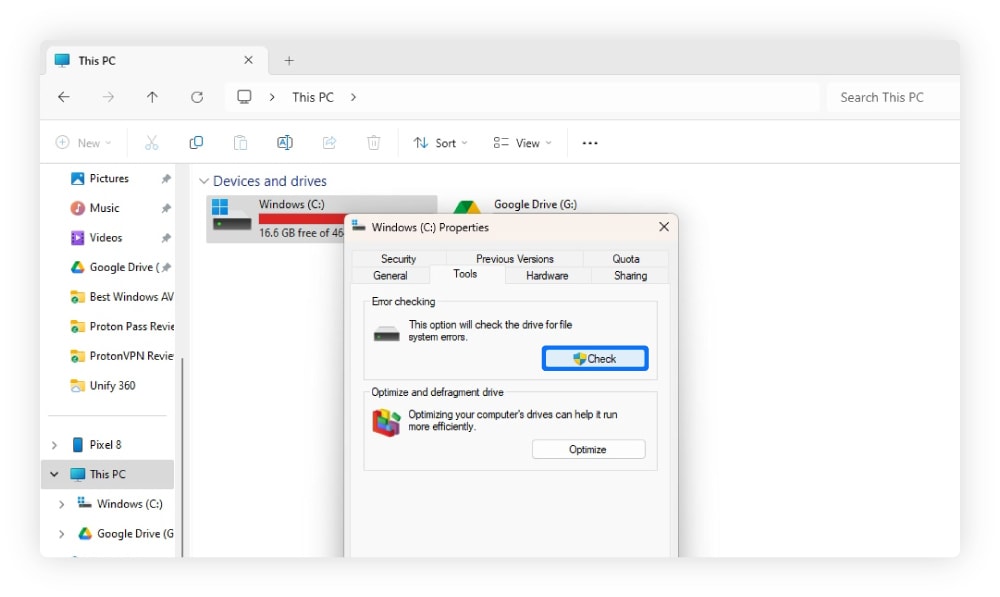
5. Click the Scan drive option — you can scan the drive even if no errors are initially found.
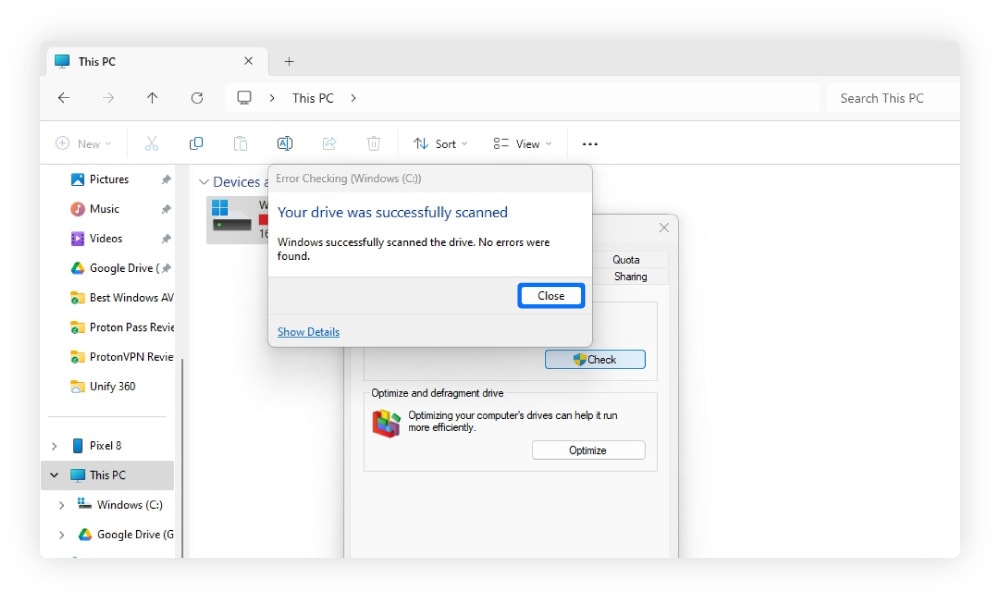
When the scan is complete, you can review any errors by clicking Show Details in the bottom-left corner of the window that pops up. If there are errors, you will be given the option to fix them.
Running CHKDSK from Command Prompt allows you to give your operating system more specific or customized instructions for checking your disk.
Here’s how to run CHKDSK from Command Prompt in Windows 7 through 11:
- Open the Start menu from the taskbar at the bottom of your Windows desktop.
- Type in cmd and click Command Prompt to open the program. Click Run as administrator.
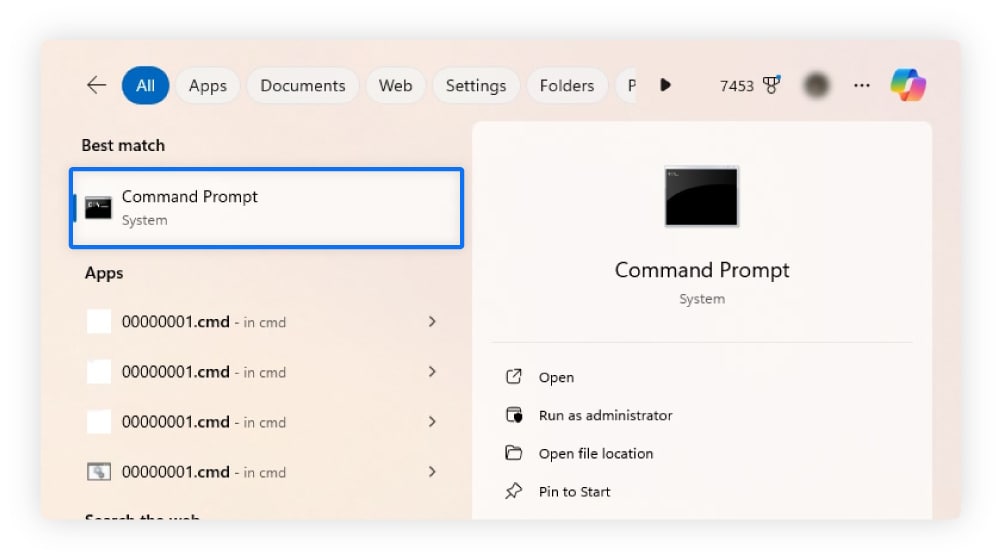
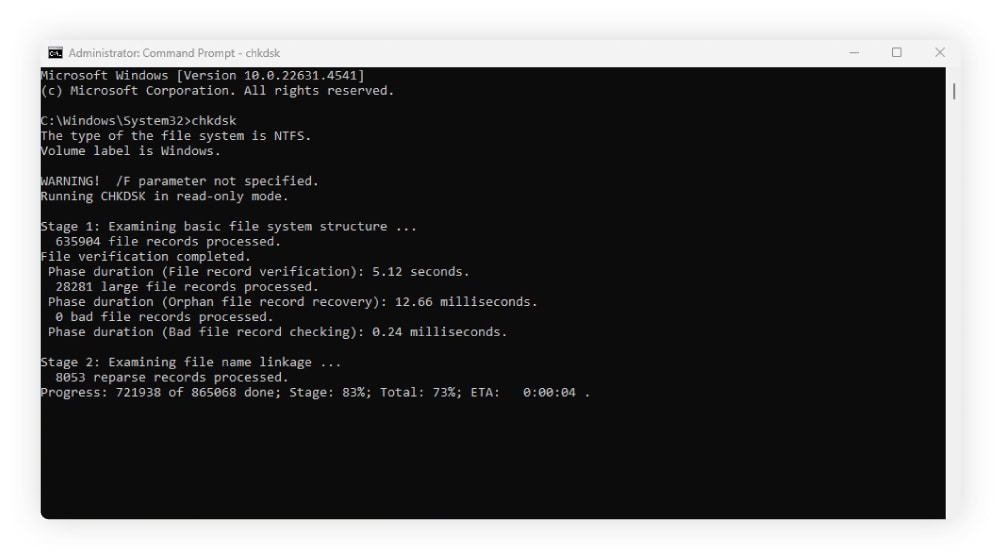
3. Type in chkdsk and hit Enter to check your hard drive. The system will let you know if it finds any errors, but it won’t fix them unless you enter another command.
If you run CHKDSK in Command Prompt, you have the option of using advanced, customized commands that may not be available through File Explorer. You can scan files, repair specific drives, check for recoverable files, and more.
One of the most important CHKDSK commands is chkdsk /f, which checks the hard drive for errors and fixes them. Any other commands from our glossary below can replace “/f.” When entering these commands, use the format “chkdsk [command]” and then hit Enter.
If you have multiple hard drives, but only want to check one, use the command format “chkdsk c: /f”, where “c:” is the name of the hard drive.
CHKDSK command |
What it does |
|---|---|
chkdsk /f |
Scans the drive for file system errors and fixes them, but does not check for bad sectors. |
chkdsk /r |
Does everything /f does and scans for bad sectors, attempting to recover readable data from them. |
chkdsk /f /r |
Does the same thing as chkdsk /r. |
chkdsk /x |
Dismounts the drive before scanning and fixing errors (useful if CHKDSK is blocked due to the drive being in use). |
chkdsk /f /r /x |
Scans the drive for file system errors and bad sectors, attempts data recovery, and forces the drive to dismount if necessary. |
chkdsk /v |
Displays detailed information about each file as CHKDSK scans the drive. |
chkdsk /scan |
Runs a real-time scan for file system errors without requiring a restart. |
chkdsk /spotfix |
Fixes specific errors detected by a previous scan in NTFS without scanning the entire drive. |
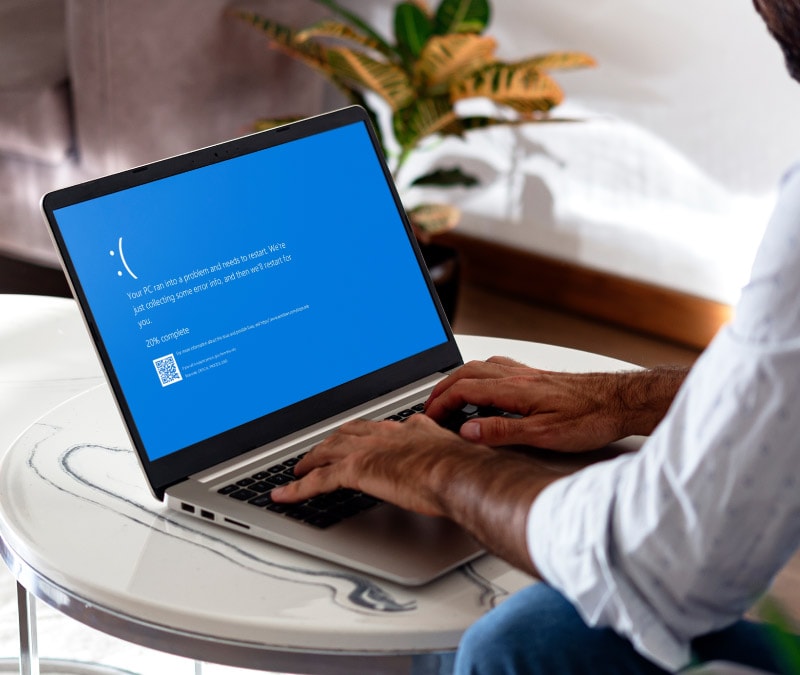
If your computer won’t start, perhaps due to the dreaded blue screen of death, you can run CHKDSK from a bootable USB drive or external hard drive with a compatible version of Windows on it. This may help fix disk-related issues preventing Windows from loading.
Here’s how to run CHKDSK from your installation media:
- Insert your external drive and restart your computer.
- Repeatedly press the boot menu key until the Windows logo appears. The boot menu key could be F12, F9, or something else, depending on your computer model.
- Select Repair your computer.
- Click Troubleshoot, Advanced Options, and Command Prompt from the blue menu.
- Enter the CHKDSK command you want to run, specifying the drive, such as chkdsk c: /f.
Restarting your PC from installation media also allows you to factory reset your computer by reinstalling Windows. This can help resolve persistent issues like crashes or slow performance, but it should be a last resort. Since a factory reset may erase all your files, be sure to back up important data before proceeding.
How to run CHKDSK on older versions of Windows
Older versions of Windows also rely on Command Prompt to run CHKDSK. You can reach Command Prompt through the Search or Start menu, depending on your version of Windows.
Here’s how to run CHKDSK on older versions of Windows dating back to XP:
- Windows 10: Open the start menu, type cmd in the search bar, and select Command Prompt.
- Windows 8: Press the Windows key + C to open the Charms Bar, click Search, and type cmd.
- Windows 7 and Vista: Open the Start menu, type cmd in the search bar, and open the command program.
- Windows XP: Click the Start menu, select Run, type cmd, and hit Enter.
While CHKDSK can fix errors and organize files, it won’t address the security risks of an outdated OS. Running an outdated or unsupported system increases your vulnerability to malware and other cyberattacks, so if you haven’t yet made the switch, now’s the time to upgrade to Windows 11.
When should I use the CHKDSK command?
You should use the CHKDSK command to check your hard drive for corrupted files, fix file system errors, and identify bad sectors (unreadable parts of your disk). This can help prevent data loss, improve system stability, and resolve certain performance issues.
Here are some more reasons to use CHKDSK:
- Your system shuts down improperly: If your system crashes while downloading or moving files, the files may become corrupted. Running CHKDSK can scan for and fix these corrupted files.
- You receive a corrupted file warning: If you try to open a file and get a corruption error, run CHKDSK to detect and repair file system damage caused by interrupted downloads, hardware failures, or software bugs.
- You’re copying the drive: Running CHKDSK before moving or cloning a drive ensures you don’t transfer corrupted files or bad sectors.
- You experience file-related errors: If an application fails to open due to missing or corrupted files, CHKDSK can help identify and fix underlying disk issues.
While CHKDSK won’t increase your download speeds or directly make your computer run faster, it helps maintain system stability by checking the integrity of your files and hard drives.
To help boost your device health and speed, consider using Norton Utilities Ultimate to disable unnecessary programs, schedule junk cleaning, and uninstall software that slows down your device — all from one app.
How to change a scheduled disk check
You can change a scheduled disk check by opening Command Prompt, typing chkntfs /t:000, and hitting Enter, with 000 representing the desired delay in seconds. For example, “chkntfs /t:60” delays the check by one minute. The maximum postponement allowed is 259,200 seconds, or 72 hours.
This can come in handy because on some versions of Windows CHKDSK runs automatically, which can be a time-consuming nuisance if you’re in the middle of something.
Troubleshooting CHKDSK errors
Sometimes CHKDSK encounters errors that can prevent it from running or completing successfully. Let’s take a look at the most common CHKDSK errors, their causes, and step-by-step solutions to resolve them.
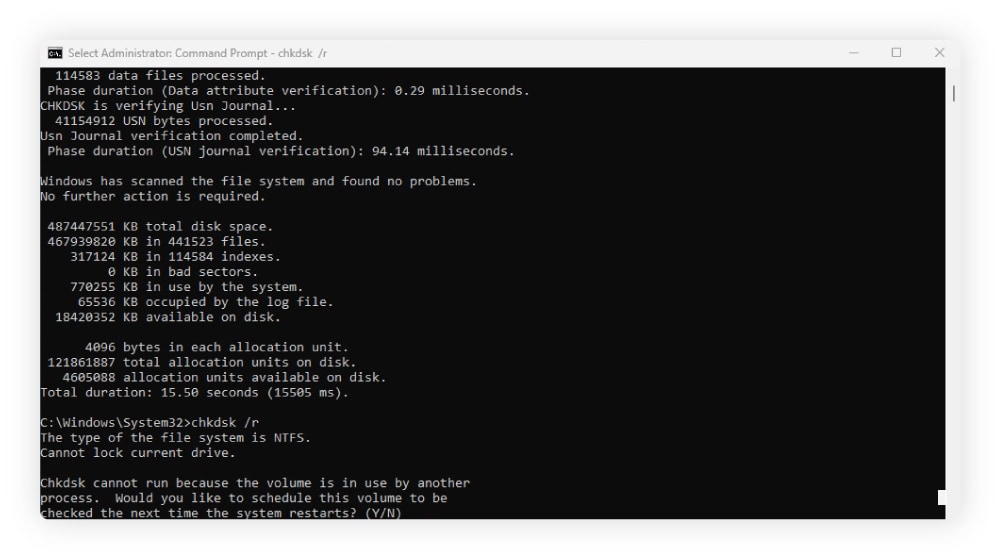
“Volume is in use” or “Cannot continue in read-only mode”
CHKDSK can only run on an inactive drive. Messages like “Volume is in use,” “Cannot continue in read-only mode,” or “Cannot lock current drive” indicate that your drive is busy, and you need to close a program. Note that “volume” refers to a drive partition, not your PC’s loudness control.
Here’s how to close programs in Task Manager:
- Press Ctrl, Alt, and Delete simultaneously.
- Select Processes from the tabs on top of the task manager window.
- Select any programs that are running and click on End task in the bottom-right corner.
If you still cannot run CHKDSK, try rebooting your PC in Safe Mode.
- Click Settings in the Start menu, then System.
- Select Recovery.
- Click Restart now under Advanced startup and wait for your PC to restart.
- Select Troubleshoot, Advanced Options, open Command Prompt, and run CHKDSK.
Alternatively, hold down the shift key while restarting to reboot your computer in safe mode. Run Command Prompt as an administrator and try to run CHKDSK again.
CHKDSK is frozen
If CHKDSK freezes for several hours, it could indicate a more serious issue with your hard drive, which may require additional troubleshooting beyond simply running CHKDSK. Start by backing up your data, then consider the following steps:
- Defragment your hard drive: Just type “defrag” into the taskbar, open Defragment and Optimize Drives, and click Optimize.
- Run disk cleanup: Click the start menu on the bottom, type Disk Cleanup in the search bar, select the program, and then choose the drive you want to clean on your computer.
- Replace corrupted files: Type sfc /scannow into Command Prompt and restart your computer to replace essential system files that may have been corrupted.
- Restore the system: Open Command Prompt as an admin and type dism.exe /online /cleanup-image/ restorehealth, which fixes parts of your Windows installation that could be damaged.
How to prevent corrupted data
You can reduce the risk of data corruption by using reliable hardware, running regular disk checks, and shutting down your computer properly. To avoid file loss, never interrupt downloads or uploads, and always power down correctly.
Here are some extra tips and details to help with corrupted data:
- Back up your files regularly: Prevent data loss by keeping backups of important files. Instead of trying to repair a corrupted file, you can simply restore it from your backup.
- Choose reliable hardware: Use storage devices from reputable manufacturers. Check online reviews to ensure you're investing in trustworthy equipment.
- Perform regular disk checks: Run disk checks regularly to catch hard drive issues before they cause data corruption.
- Shut down your computer properly: Avoid forcing a shutdown by holding down the power button. Shut down your computer from the start menu to avoid interrupting active processes and risking file corruption.
- Scan for malware: Use reputable antivirus software to scan for malware and identify malicious files before they have a chance to corrupt your computer.
- Enable autosave: Use tools like AutoSave, cloud storage, or version control to keep older versions of documents. If a file becomes corrupted, you can easily revert to a previous version.
- Don’t interrupt data transfers: Allow downloads and uploads to fully complete before closing your computer or disconnecting. Interrupting a transfer can result in corrupted files for both you and the recipient.
- Keep your system updated: Keep your operating system and software up to date, as updates often include fixes for bugs that could lead to data corruption.
- Use power protection: Consider using a UPS (Uninterruptible Power Supply) to protect your system from sudden power outages, which can cause data corruption.
Maintain your computer’s health
If not properly maintained, computers can malfunction and slow down. While some issues are quick fixes, others can be more complex and time-consuming, which may feel overwhelming if you’re not tech-savvy.
That’s where an automated PC optimization tool comes in. Get Norton Utilities Ultimate to help keep your computer running at its best by scheduling file cleanings, uninstalling unwanted programs, and cleaning up junk to reclaim valuable space. Unlock your PC’s full potential today.
FAQs
How long does CHKDSK take?
CHKDSK can take up to a few hours depending on the number of files it needs to scan. Commands like chkdsk /r check the entire disk for bad sectors, which can take significantly longer than scans like chkdsk /scan, which only checks for file system errors.
Is CHKDSK safe?
Yes, CHKDSK is safe to use. It is a built-in Windows tool designed to detect and repair disk issues without causing harm to your data.
Does CHKDSK fix corrupt files?
By itself, CHKDSK doesn't fix corrupt files. However, the chkdsk /r command scans and fixes corrupt files across your computer. You can also use chkdsk /spotfix to fix specific files found in smaller scans.
Does CHKDSK create log files?
Yes, you can retrieve CHKDSK log files by using report commands like chkdsk /v, to generate a report on corrupted files. You can view these logs in the Event Viewer, reachable from the Windows start menu.
Which is better, CHKDSK /r or /f?
Chkdsk /f is best if you need a quick scan to fix file system errors, while Chkdsk /r is better if you suspect bad sectors on your drive and want to relocate data from them. Since Chkdsk /r includes everything Chkdsk /f does while also scanning for bad sectors, it takes longer to run.
How to run CHKDSK from BIOS
You cannot run CHKDSK from the BIOS. Instead, try running CHKDSK from installation media.
How to run CHKDSK on a specific drive
You can run CHKDSK on a specific drive by opening Command Prompt and typing in chkdsk c:/ followed by your command, replacing the “c:/” with your disk drive letter. You can find all your drives under This PC in File Explorer.
Editors’ note: Our articles offer educational information and are written to raise awareness about important topics in Cyber Safety. Norton products and services may not protect against every type of threat, fraud, or crime we write about. For more details about how we research, write, and review our articles, see our Editorial Policy.


Want more?
Follow us for all the latest news, tips, and updates.