What is my DNS? How to find your DNS server
DNS servers translate domain names into IP addresses, similar to how your contact list matches phone numbers and names. You can find your DNS in your network or Wi-Fi settings. Learn more in our guide and discover how the built-in threat detection features of Norton 360 can help you identify hidden scams and dangerous sites.


Ever wondered how your computer knows where to find the website you just typed in? That’s your DNS server working behind the scenes. While many people never adjust their DNS settings, some users may want to change their DNS server for troubleshooting, security, or performance reasons.
In this article, we’ll show you how to find your current DNS server and discuss whether changing it might benefit you.
What is a DNS server?
A DNS server translates human-friendly website names (like norton.com) into the numerical IP addresses that computers use to communicate. Whenever you enter a website address, your computer asks your DNS server to retrieve the correct IP address, allowing you to connect to the site.
This process relies on the Domain Name System (DNS), the Internet’s “address book,” which keeps track of domain names and their corresponding IP addresses.
How to find your DNS IP on every device
You can find your DNS server’s IP address in your device’s network settings. It’s typically structured as four sets of numbers separated by three periods. The process for finding your DNS IP may differ slightly depending on your specific device, but all platforms require an active internet connection.
Find your DNS on Windows
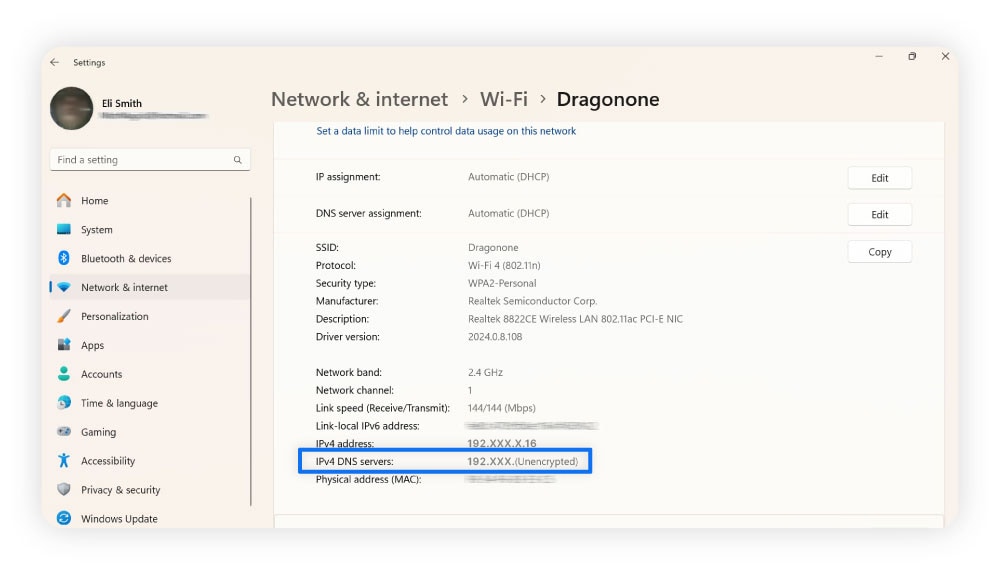
You can find your DNS server’s IP address on Windows by looking at your Network and Internet settings.
Here’s how to find your DNS on Windows 10 or 11:
- Open the Start menu and select Settings.
- Select Network & internet and click your active network’s Properties.
- Scroll down until you see your IPv4 DNS server.
Alternatively, you can open Command Prompt, type ipconfig/all, and hit the Enter key. This reveals network information like your DNS server, IP address, subnet mask, and more, which can also be handy for other network activities like port forwarding.
Find your DNS on a Mac
You can check your DNS server’s IP address on a Mac by going to Network in your System Settings.
Here’s how to find your DNS on a Mac:
- Click the Apple icon in the upper-left corner and select System Settings.
- Select Network, then Wi-Fi if you’re connected wirelessly, and click Details next to your active connection.
- Select DNS from the left-hand navigation menu to view your DNS server.
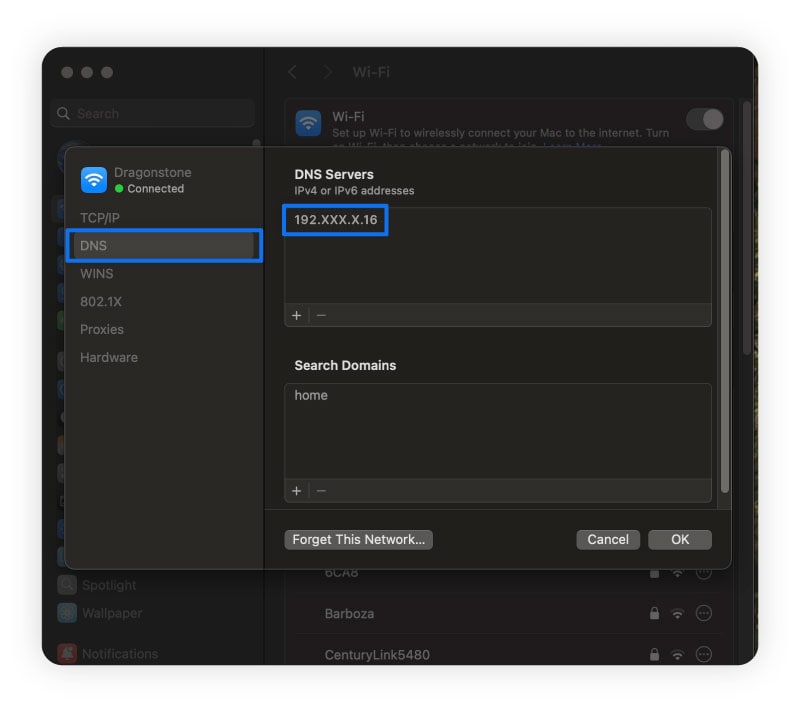
On the left, you can also see information about your IP address, proxy servers, and hardware. Note that adding a proxy (like a VPN) might affect how your DNS appears, as VPNs can hide your IP and DNS information behind other servers.
Find your DNS on Android
You can find your DNS IP address on Android by opening your current internet connection under Settings and scrolling down until you see it.
Here’s how to find your DNS on an Android phone:
- Open your apps menu and select Settings, tapping Network & internet near the top.
- Select your internet connection and the gear icon next to your active Wi-Fi.
- Scroll down to Network details until you find a header that says DNS.
Find your DNS on an iOS device
On iOS devices, you can find your DNS information in the Settings of your active Wi-Fi connection.
Here’s how to find your DNS on your iPhone or iPad:
- Select Settings and tap Wi-Fi.
- Select the info icon (the “i”) next to your active Wi-Fi connection.
- Scroll until you find the Configure IP settings and tap it to view your DNS information.
How to find your DNS server on your router
To check which DNS server your router is using, you’ll need to access the router settings through a web browser. Follow these steps to find your DNS information:
- Find your router’s IP address on any of your network-connected devices.
- Enter the IP address into your web browser’s address bar and press Enter.
- Log into your router’s admin panel using your credentials (if you haven't changed them, try “admin” for both the username and password).
- Navigate to the Connection or Status menu, then look for DNS settings or Network settings to find the DNS server address your router is using.
If you don’t see your DNS provider’s details in the router settings, contact your Internet Service Provider (ISP). They can confirm whether they provide their own DNS servers or use a third-party provider.
How to find your DNS server using a DNS checker
You can quickly find your DNS server by using an IP leak checker. Unlike some DNS checkers that only work with public domains, IP leak checkers reveal the actual DNS servers handling your queries.
To use an IP leak checker, visit a website like ipleak.net, which will display your DNS server information as soon as the page loads — it may take some time, so be patient.
Why you might want to change your DNS settings
You may want to change your DNS settings to speed up your internet, enhance your privacy online, access blocked websites, or troubleshoot connectivity issues.
- Speed up your internet: Some public DNS providers may resolve domain names faster than your ISP’s default DNS, improving download speeds and reducing website load times.
- Enhance security and privacy: Some third-party DNS services offer encryption, malware filtering, and DNS over HTTPS, helping protect against dangerous websites, DNS hijacking, and worms.
- Access blocked websites: If your ISP blocks certain websites or restricts content, switching to a different DNS provider may allow access to geo-restricted or censored content.
- Improve your connection: ISP DNS servers can suffer from downtime, slow response times, or misconfigurations. Switching to a reliable public DNS reduces the risk of connection issues caused by DNS failures.
- Troubleshoot network issues: If you’re experiencing slow loading times, failed connections, or frequent DNS errors, switching to a different DNS server can help diagnose whether the problem lies with your ISP’s DNS or another network issue.
How to change your DNS server
To change your DNS server, you can switch to a manual DNS server selection in your device’s Wi-Fi settings. All you need to do is type in the IP address or hostname of the DNS server you want to use.
Below are several popular alternative DNS servers:
Provider and hostname |
Primary DNS |
Secondary DNS |
|---|---|---|
Google |
8.8.8.8 |
8.8.4.4 |
Cloudflare |
1.1.1.1 |
1.0.0.1 |
OpenDNS Home |
208.67.222.222 |
208.67.220.220 |
Quad9 |
9.9.9.9 |
139.112.112.112 |
How to change your DNS server on Windows
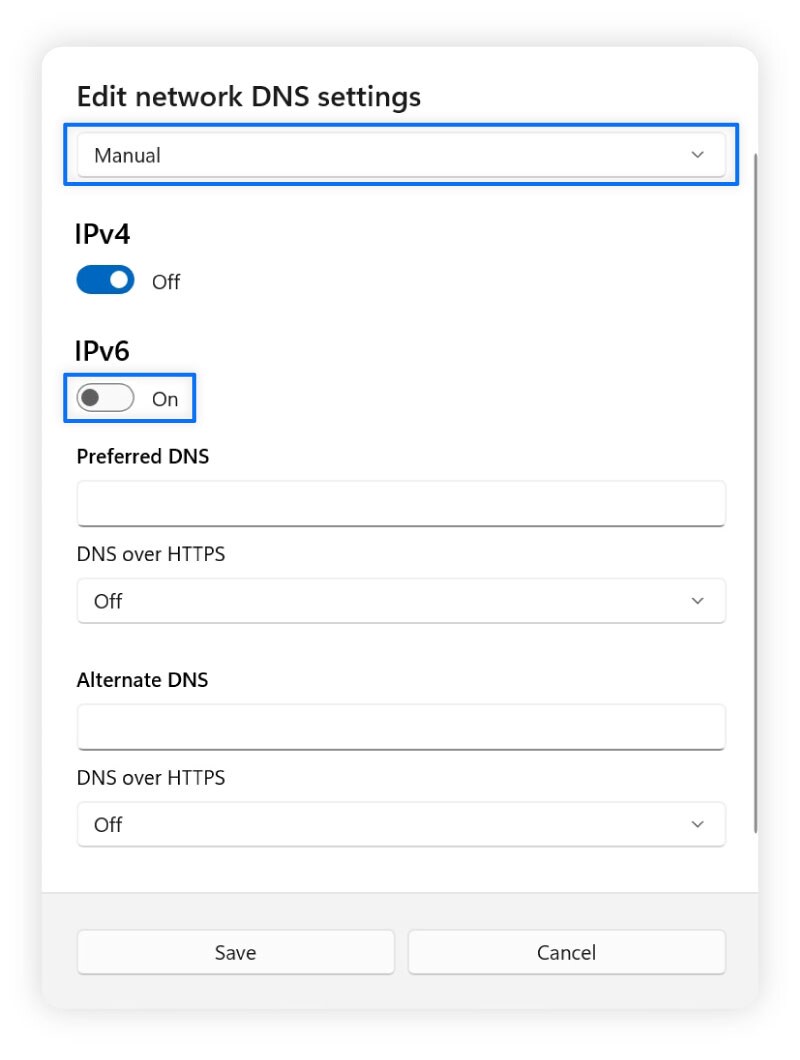
Here’s how you can change your DNS on Windows:
- Go to Start > Settings > Network & internet and select your active Wi-Fi connection.
- Scroll down and click Edit next to DNS server assignment.
- Switch the dropdown menu on top from Automatic to Manual.
- Type in the DNS server you want to use in the Preferred DNS field.
- Click Save.
How to change your DNS server on Mac
Here’s how to change your DNS settings on Mac:
- Click the Apple icon > System Settings > Network > Details next to your active connection.
- Click DNS in the left-hand menu and the plus icon below your DNS server list.
- Type in the DNS server you want to use and click OK.

How to change your DNS server on Android
Here’s how to change your DNS settings on Android phones:
- Go to Settings > Network & internet > Private DNS.
- Select Private DNS provider hostname and enter the hostname of the DNS server you want to use.
Changing your private DNS provider on Android also affects 4G and 5G mobile connections, which can improve mobile security by encrypting DNS queries and protecting against tracking or malicious websites.
How to change your DNS server on iOS
Here’s how to change your DNS settings on iOS devices:
- Open Settings, tap Wi-Fi, and select the i icon next to your active Wi-Fi connection.
- Scroll down until you see Configure DNS, and then tap it.
- Select Manual and then enter the IP address of your DNS server.
Browse the internet more safely
Changing your DNS server can help enhance your internet connection’s privacy and security, but it won’t keep determined hackers at bay.
For ironclad protection, you need a dedicated security app. Norton 360 Deluxe features an arsenal of powerful cybersecurity tools, including a built-in VPN, malware protection, a firewall, and 24/7 AI-powered scam detection capabilities.
FAQs
How does the DNS work?
The DNS (Domain Name System) converts domain names into numerical IP addresses, allowing browsers to connect to websites. When you enter a web address, a DNS resolver queries different DNS servers to find the correct IP address. This process happens in the background as you browse the internet.
What is a DNS lookup?
A DNS lookup is the process of retrieving the IP address associated with a domain name so your device can access a website. When you enter a domain name, your device sends a DNS query to find the corresponding IP address from a DNS resolver. DNS lookups can also work in reverse, finding a domain name from an IP address.
What is DNS propagation?
DNS propagation is the time it takes for DNS changes (such as a new IP address for a website) to be updated across all DNS servers worldwide. This process can take anywhere from a few minutes to 72 hours, depending on caching and TTL (Time to Live) settings.
Is 1.1.1.1 the fastest DNS?
The address 1.1.1.1 is one of the fastest public DNS servers available. It’s provided by Cloudflare and is a popular alternative to other public providers like Google Public DNS and OpenDNS.
How do I find out what my DNS provider is?
You can find your current DNS provider using online tools like DNS Leak Test (click Extended test) or by running the command nslookup or ipconfig /all for Windows or scutil --dns for Mac. If you haven’t changed it, your DNS provider is likely your Internet Service Provider (ISP).
How do you find your DNS on PS4?
To find your DNS for gaming on the PS4, navigate to Settings, then Network, and select Set Up Internet Connection. Choose your connection type (Wi-Fi or LAN), select Custom, and then Manual for IP Address Settings. You will find the DNS settings displayed after configuring the IP Address.
Editors’ note: Our articles offer educational information and are written to raise awareness about important topics in Cyber Safety. Norton products and services may not protect against every type of threat, fraud, or crime we write about. For more details about how we research, write, and review our articles, see our Editorial Policy.


Want more?
Follow us for all the latest news, tips, and updates.