How to lower CPU usage: 12 ways
High CPU usage can make your computer stutter, which can be a major headache when browsing the web or streaming your favorite shows. Luckily, there are some fairly simple fixes. Follow these tips to reduce CPU usage, and install Norton Utilities Ultimate to help optimize your device’s performance.

2025
Consumer
Security Innovator


- Restart your computer
- Disable notifications
- Disable unnecessary apps
- Turn off startup programs
- Limit browser extensions and close tabs
- Update software and drivers
- Change your power settings
- Physically clean your computer
- Scan for malware
- Clean your hard drive
- Defragment or optimize your hard drive
- Restart the WMI provider host
- What causes high CPU usage?
- How can I track my CPU usage?
- Lower CPU usage with Norton Utilities Ultimate
- FAQs
Your computer’s central processing unit, or CPU for short, acts like its brain: it runs all the essential operations that keep your computer working smoothly. But demanding tasks like gaming or video editing can push your CPU to its limits. If your system starts to lag or overheat, lowering CPU usage can help it run more efficiently. Read on for practical tips to reduce CPU load and improve performance, or jump to a particular section:
- Restart your computer
- Disable notifications
- Disable unnecessary apps
- Turn off startup programs
- Limit browser extensions and close tabs
- Update software and drivers
- Change your power settings
- Physically clean your computer
- Scan for malware
- Clean your hard drive
- Defragment or optimize your hard drive
- Restart the WMI provider host
Restart your computer
Probably the easiest way to lower CPU usage is to restart your computer, which makes your computer faster by clearing temporary files, shutting down background processes, and refreshing system resources. Over time, software can develop memory leaks, where applications fail to release memory properly even after you close them. This can gradually degrade system performance. Restarting helps reset everything.
Disable notifications
Disabling notifications is an easy way to free up a small amount of CPU usage. This helps with background tasks that send a lot of notifications, which can add up and slow down your computer.
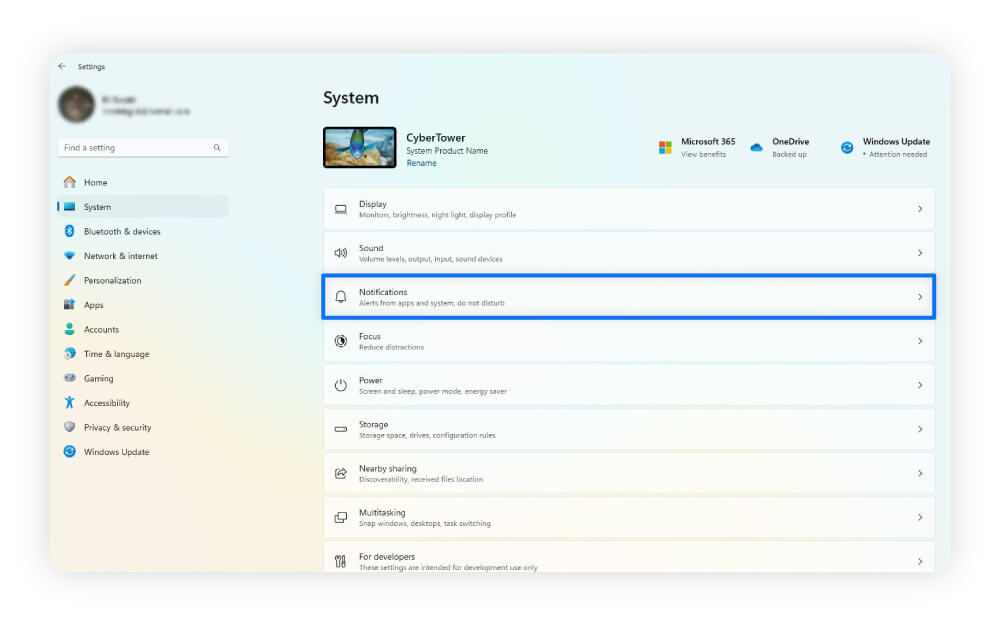
Here’s how to disable notifications on Windows:
- Open Settings and select System.
- Scroll down and select Notifications.
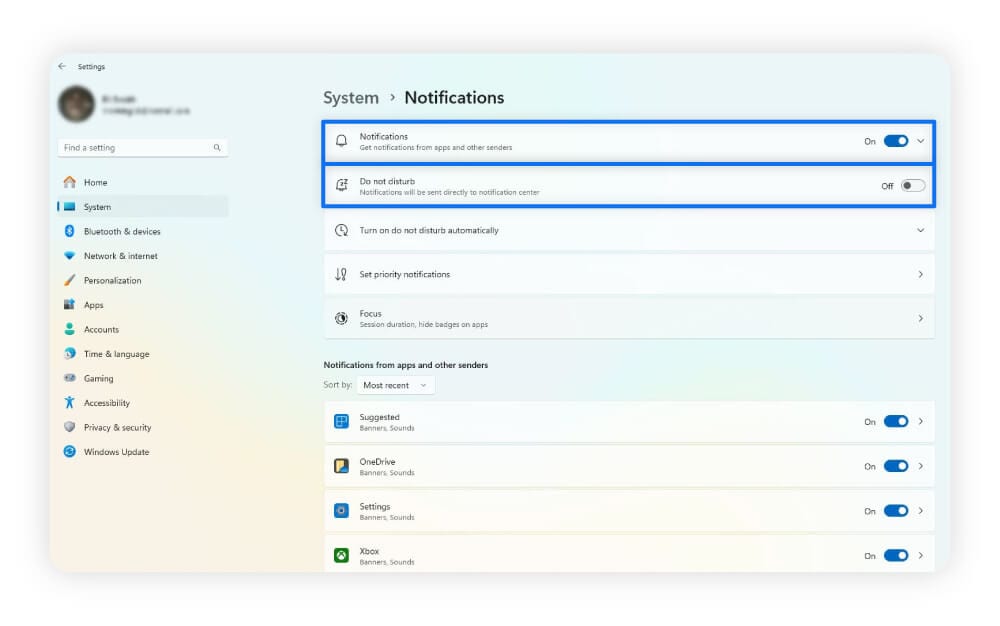
- Toggle off Notifications from the top menu to turn off all notifications, or scroll down further to select which notifications you want to disable.
You can also toggle Do Not Disturb mode on to stop notifications temporarily.
On Macs, you can find the option to disable notifications permanently or temporarily under System Settings in the Notifications section.
Disable unnecessary apps
Disabling unnecessary apps reduces CPU usage by saving resources for apps you’re actively using. Some programs you could close include Google Chrome, Safari, OneDrive, Apple Cloud, and Zoom.
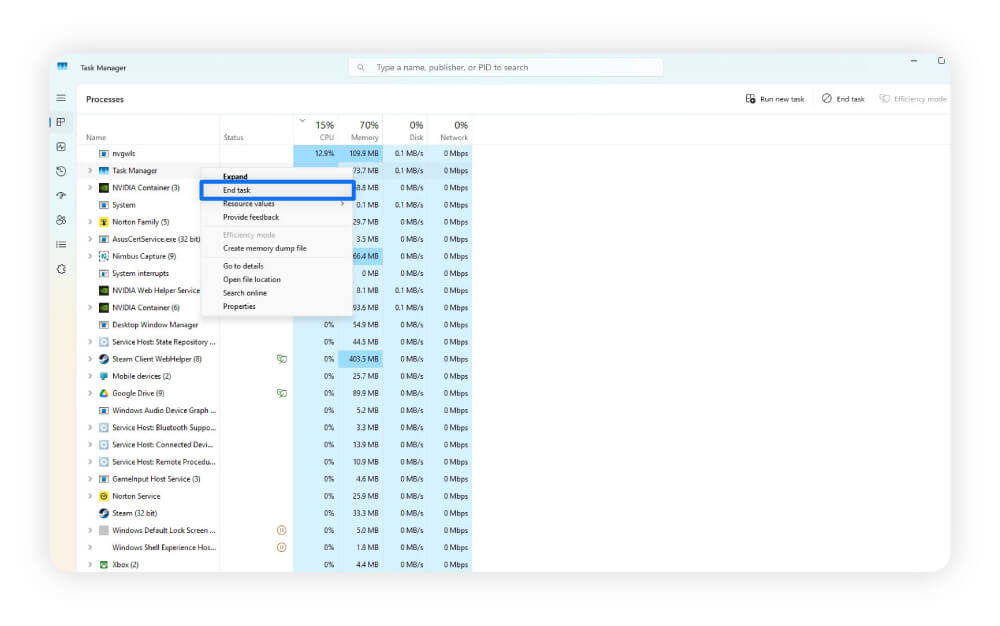
You can reduce CPU usage on Windows devices by stopping processes through Task Manager, following these steps:
- Press and hold Ctrl, Alt, and Del on your keyboard.
- Choose Task Manager.
- Select the Processes tab and click the CPU column header to sort by highest CPU usage.
- Select the process you want to close and click End Task.
Mac devices rely on Activity Monitor to disable processes and track CPU usage, which you can do through these steps:
- Open Activity Monitor (in Utilities or do a Spotlight search).
- In the CPU tab, click the % CPU column header to sort by size.
- Select the process you want to end, and click X at the top, then Quit.
Removing unnecessary programs can also be a great way to save space while ending processes that steal CPU power. If you want to uninstall bloatware, but you’re afraid of deleting an important program, Norton Utilities Ultimate can find and uninstall programs safely. It will also help speed up your computer and fix common problems.
Turn off startup programs
Turning off startup programs can reduce CPU usage by preventing unnecessary programs from launching each time you restart your computer. This has the added benefit of making startup quicker.
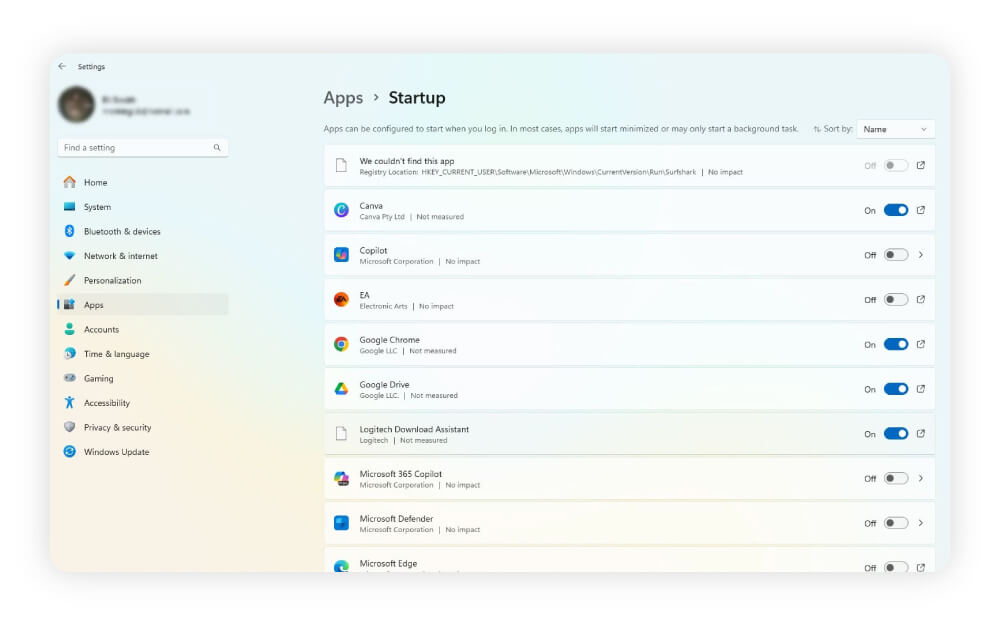
Windows lets you disable startup programs from the settings:
- Open Settings, select Apps and click the Startup menu.
- Toggle off the apps you don’t want to open at startup.
To disable startup programs on a Mac:
- Go to System Settings, then General.
- Scroll down and select Login Items & Extensions.
- Click any programs under Open at Login and click the minus button at the bottom to remove them.
Limit browser extensions and close tabs
Most popular browsers are notorious for heavy CPU use. Disabling unnecessary extensions and avoiding keeping too many tabs open can help lower CPU usage.
Here’s how to disable browser extensions on Chrome:
- Open the extension page by clicking the puzzle piece icon near your search bar, then click Manage extensions.
- Scroll through the list of extensions to find ones you want to disable.
- Toggle off extensions by clicking the blue switch in the bottom-right corner of the extension box to turn it to grey.
Update software and drivers
Updating your software and drivers helps your CPU run more efficiently by addressing errors in older program versions or updating the code. Software and drivers will usually receive automatic updates when you update your operating system.
To update your operating system on Windows:
- Go to Settings, and click Update & security.
- Select Windows Update and click Check for updates.
- Wait while Windows loads available updates.
Alternatively, you can visit the Windows support page and select Check for updates. If you’re using Windows 10, you can also find updates from the Control Panel.
To update your drivers before a regularly scheduled Windows update, use Device Manager:
- Right-click the Start menu and select Device Manager.
- Click the arrow next to the driver type you want to update, such as your graphics card drivers.
- Right-click the desired device and select Update driver in the Driver tab.
- Select Search for updated drivers on Windows Update.
Windows will usually find most updates, but you can also download them from the manufacturer’s website.
To save time and effort, you can also get Norton Driver Updater, which updates your Windows drivers automatically. Norton Driver Updater relies on an online database of over 50 million drivers. It will choose the optimal match based on your operating system version and your particular PC configuration.
To update your operating system on a Mac:
- Select System Settings and click General.
- Choose Software Update and wait for your Mac to check for the latest version.
- Click Update next to the latest version of your operating system.
Macs should update software and firmware automatically, but you could also check the App Store or your software’s update system to check for the latest version.
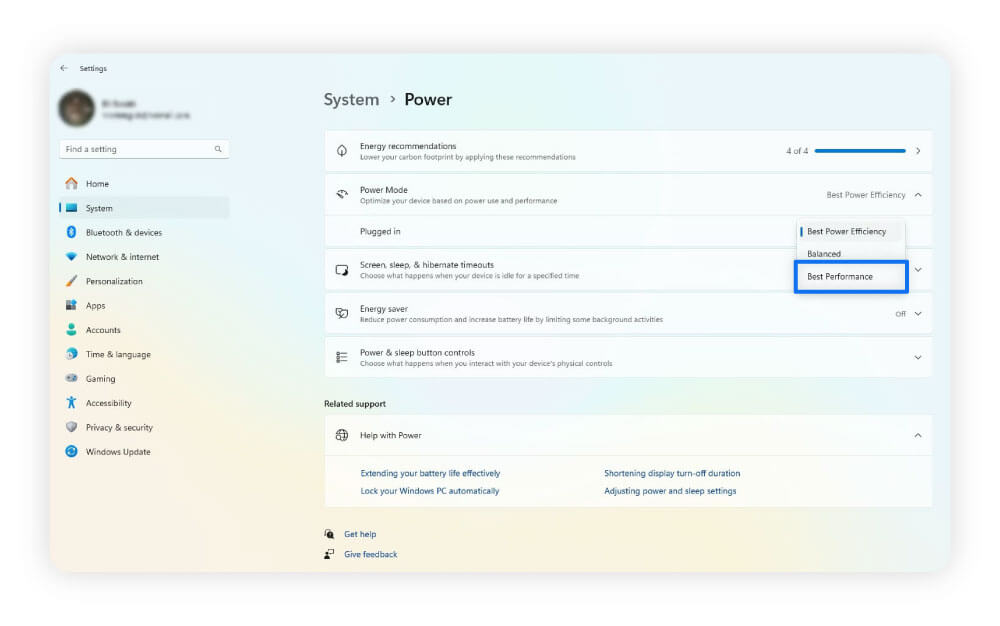
Change your power settings
Adjusting your power settings to a high-performance mode can improve CPU responsiveness and overall system speed, especially during demanding tasks. While this doesn’t directly lower CPU usage, it allows your CPU to run at higher clock speeds and finish tasks faster.
In contrast, low-power or eco modes limit performance to conserve energy, which can slow your computer down under heavy workloads.
Power settings that improve your CPU’s performance include Best Performance or Balanced. Note that changing power settings to Best Performance uses more battery.
Here’s how to adjust your power settings on Windows devices:
- Open the Start menu and select Settings.
- Select the System tab and go to the Power settings.
- Choose Best Performance or Balanced.
You can adjust power settings on Mac devices by following these steps:
- Go to System Settings, then Battery.
- Click the drop-down menu next to Lower Power Mode.
- Change the power settings to Never or Only On Battery to increase power usage.
A Mac’s Only On Battery mode enables power-saving mode when disconnected from an outlet. This way, anytime you’re connected to an outlet, your Mac device uses more power, enabling higher CPU usage when plugged in.
Physically clean your computer
Cleaning your computer by removing dust from inside and around your vents reduces CPU usage by helping it to cool, leading to higher performance levels. A hot CPU runs slower, putting strain on your device. Clean your computer regularly as part of your maintenance checklist to help prevent this.
Use a microfiber cloth slightly dampened with rubbing alcohol on outside surfaces and vents. Use canned air for sensitive interior parts, like your fans, power supply, and motherboard. Try to clean your computer every six months, or when needed, to keep your device cool.
Scan for malware
Malware programs can hide and run in the background, consuming your computer’s power and stealing your information. Scan your computer for basic malware with Windows Defender or Mac’s XProtect. Finding and removing malware quickly helps keep your data safe.
To help stop malware before it can affect you, get Norton AntiVirus Plus. Norton AntiVirus Plus provides real-time protection against malware, helps stop account takeovers, and helps you spot hidden scams, keeping you and your device safer online.
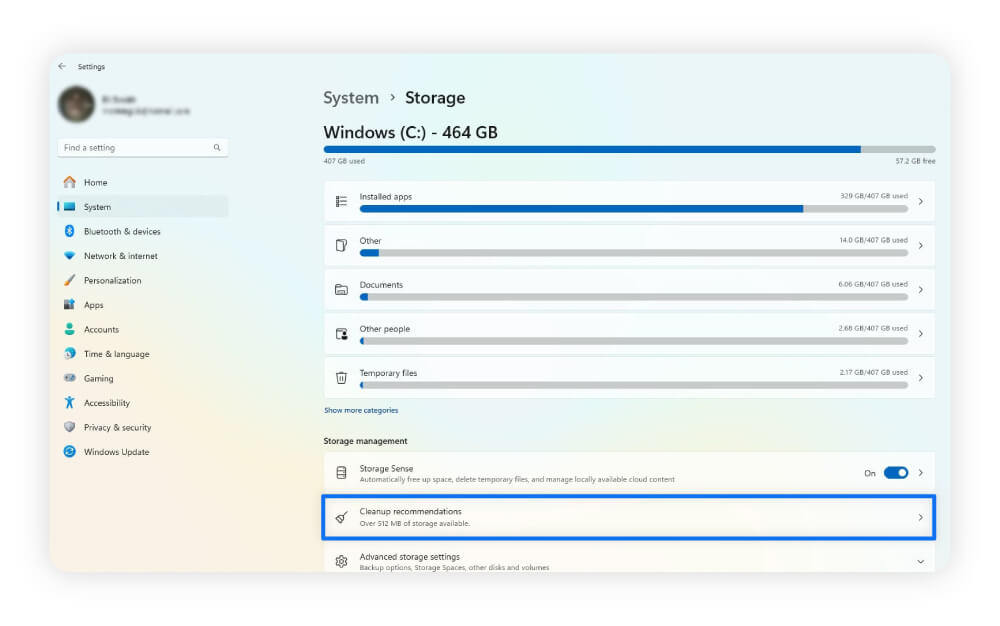
Clean your hard drive
Cleaning your hard drive reduces CPU usage by minimizing the power it needs to access files, as there are fewer of them to sort through. You can uninstall unwanted programs, delete files manually, or use your device’s built-in cleanup tools. If you want to start from a blank slate, you can also wipe your hard drive, but make sure you back up any important files first.
Here’s how to use Disk Cleanup on Windows:
- Open Settings, go to System, and select Storage.
- Select Cleanup recommendations near the bottom.
- Choose the file categories you want to clean.
Macs have a built-in cleanup tool called Disk Utility, which lets you manage drives and check for disk errors.
- Open Disk Utility (in Utilities or do a Spotlight search).
- Click First Aid at the top, then Run.
Cleaning your disk using built-in tools is a great start, but Norton Utilities Ultimate provides a more comprehensive solution for those who want a faster machine.
You can schedule regular cleaning to automatically remove system junk and more. Set it up once, then sit back and relax knowing that your device will get the tuneup it deserves.
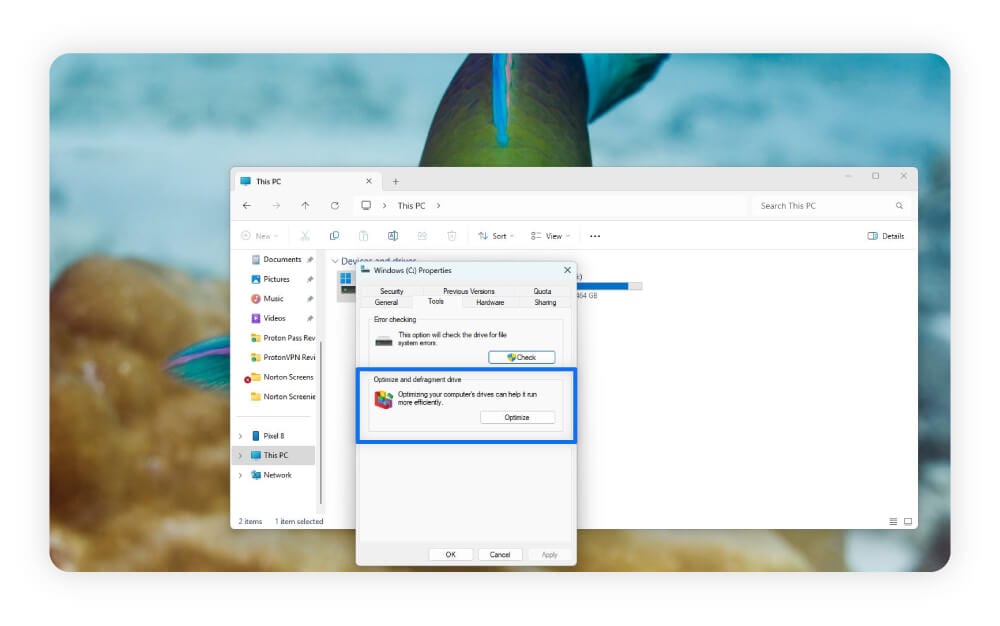
Defragment or optimize your hard drive
Defragmenting your hard drive doesn’t directly lower CPU usage, but it can improve overall system efficiency. On traditional hard disk drives (HDDs), files can become fragmented. This is when they’re stored in pieces across different parts of the disk, forcing the drive to work harder to find the data, which can slow down performance.
Defragmentation reorganizes these pieces into contiguous blocks, making file access faster and reducing the time the CPU spends waiting on the drive. Note: never defragment a solid state drive (SSD), as this can harm it. Nearly all modern Macs and most modern Windows devices have an SSD now, so check which kind of drive you have first.
Here’s how to defragment a hard disk drive on Windows:
- Type Optimize and Defragment Drive in your computer’s search bar and launch it.
- Select the drive you want to optimize.
- Click Optimize (or defragment if using an older version of Windows).
Norton Utilities Ultimate also includes a built-in defragmentation tool to help optimize your hard drive the easy way.
Another way to indirectly contribute to lower CPU usage is with the CHKDSK command. Short for “check disk,” it fixes corrupted files and identifies hard drive failures, improving system stability. While CHKDSK doesn’t directly lower CPU usage, improving stability can keep your computer from crashing.
Restart the WMI provider host
Restarting the Windows Management Instrumentation (WMI) service can temporarily lower CPU usage if the WMI Provider Host is consuming excessive resources. This service supports system monitoring and management tasks, but sometimes a faulty application or script can trigger continuous WMI queries, leading to high CPU load.
Restarting WMI may clear these stuck processes, but it’s a short-term solution. If the issue persists, identifying and fixing the underlying application is key.
Here’s how to restart your WMI provider host:
- Press Win + R, type services.msc in the Run window, and press Enter.
- Scroll down until you see Windows Management Instrumentation.
- Right-click it and select Restart from the drop-down menu.
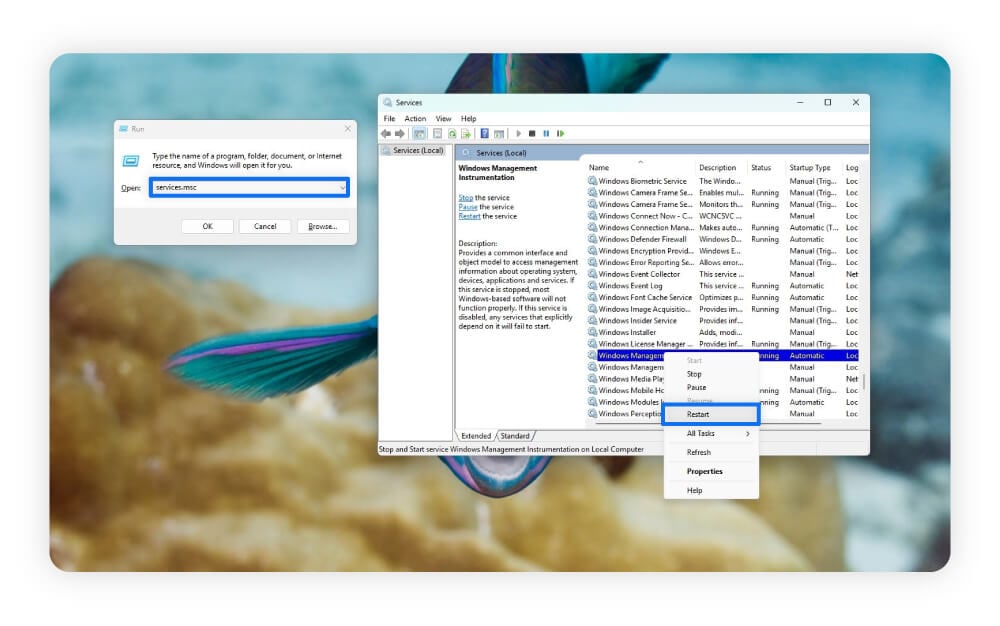
Only reset your WMI host provider when not handling important tasks. Restarting your WMI can temporarily disrupt administrative, remote management, and monitoring processes.
On Macs, there is no equivalent to the WMI host provider. Instead, review your Activity Monitor to check for services or applications with high CPU usage.
What causes high CPU usage?
High CPU usage occurs when your computer runs too many applications or background tasks. You might also have outdated software, malware infections, or hardware issues.
Here’s why your CPU usage might be high:
- Too many applications open: Having too many applications open, even if they’re small, can add up within your processor.
- High-demand applications: Demanding applications like 3D animation software and video games consume more system resources.
- Numerous background tasks: Background tasks, such as automatic backups, can consume your CPU’s resources.
- Malware infections: Trojans and other malware often consume resources in the background. For example, cryptojacking attacks mine cryptocurrency on your device, which results in CPU spikes.
- Outdated software: Outdated software may lack optimizations, contain bugs, or be incompatible with your operating system.
- Overheating device: An overheating computer can be both a sign and a cause of high CPU usage.
- Hardware issues: Motherboard, CPU, or wire damage are just a few examples of hardware issues that could lead to high CPU usage.
- Overclocking your CPU: Overclocking your CPU pushes it beyond factory settings to make your computer faster. While this can speed up your computer in short bursts, overburdening your processor can lead to high CPU usage.
How can I track my CPU usage?
You can check your CPU usage in real time using Task Manager on Windows and Activity Monitor on a Mac. Both built-in tools reveal your CPU usage and let you sort by which programs have the highest usage.
To track and monitor your CPU usage, it’s best to use a third-party tool:
- CoreTemp: A free Windows tool that measures CPU usage for each core in multi-core processors. You can also track your CPU’s temperature.
- PRTG: Another free Windows tool that measures CPU usage and temperature across multiple days.
- SysGauge: This tool monitors Windows CPU and memory usage for free. You can also monitor the status of specific processes and the performance of your drive’s speed.
- Usage - Device Monitor: A free Mac tool with in-app purchases, that tracks simple CPU usage stats from the menu bar at the top.
- iStatistica Pro: A paid Mac tool that lets you monitor information about your CPU, RAM usage, and network data.
Lower CPU usage with Norton Utilities Ultimate
Keeping your CPU usage low helps you enjoy the activities that matter most to you on your computer — and it can also help extend its lifespan. Get Norton Utilities Ultimate to automatically clean out system junk and disable unnecessary processes on your device, so you can enjoy a faster, smoother machine.
FAQs
Is 80% CPU usage bad?
If you’re gaming or using resource-intensive programs, it’s common for CPU usage to spike to 80%. However, if your computer is reaching 80% CPU usage when idle or performing basic tasks, this could indicate issues.
Is overclocking a CPU safe?
Overclocking a CPU is generally safe on modern hardware because most processors have built-in failsafes to help prevent damage. Older CPUs are riskier because they might lack these failsafes. However, overclocking always carries some risks, regardless of age or device.
Why is my CPU so hot?
Your CPU may be overheating due to a high CPU load, a broken heatsink, old thermal paste, or poor ventilation.
Editors’ note: Our articles offer educational information and are written to raise awareness about important topics in Cyber Safety. Norton products and services may not protect against every type of threat, fraud, or crime we write about. For more details about how we research, write, and review our articles, see our Editorial Policy.


Want more?
Follow us for all the latest news, tips, and updates.