How to change your IP address on iPhone in a few simple steps
Whether you’re on holiday, working remotely, or relaxing at home, changing your iPhone’s IP address can help you hide your real location, avoid invasive tracking, and even watch all your favorite shows. Keep reading to learn how to do it and get Norton VPN to start browsing, streaming, and shopping securely from virtually anywhere in the world with just a few taps.

2025
Consumer
Security Innovator


- How to manually change your private IP address on iPhone
- How to change your public IP address on iPhone using a VPN
- Change your iPhone IP address with a proxy Server
- Other ways to change your iPhone IP address
- Why you should change your IP address
- Take control of your online privacy with Norton VPN on your iPhone
- FAQs
Your IP address is a unique number that identifies your iPhone (or any device) on the internet. Think of it as your phone’s digital home address. Just as you wouldn’t hand out your real address to strangers, there are times you might want to change your iPhone’s IP to boost privacy, access content, or troubleshoot network issues.
Before we dive in, it’s important to note that IP addresses come in different types — public and private, static and dynamic — and the steps to change them vary. In this guide, we’ll walk you through all the main methods for changing your iPhone’s IP address, so you can stay secure, connected, and in control wherever you go.
How to manually change your private IP address on iPhone
Your private (or local) IP address is used only within your home, office, or other local network — it’s not exposed to the wider internet. Because it’s only visible to other devices on the same network, it can’t be used by websites or other third parties to track you online.
Changing your private IP address won’t protect your online privacy or help you bypass geo-blocking, but it can help fix Wi‑Fi connectivity problems or IP conflicts by giving your device a fresh address within the network.
Here’s how to manually change your private IP address on an iPhone:
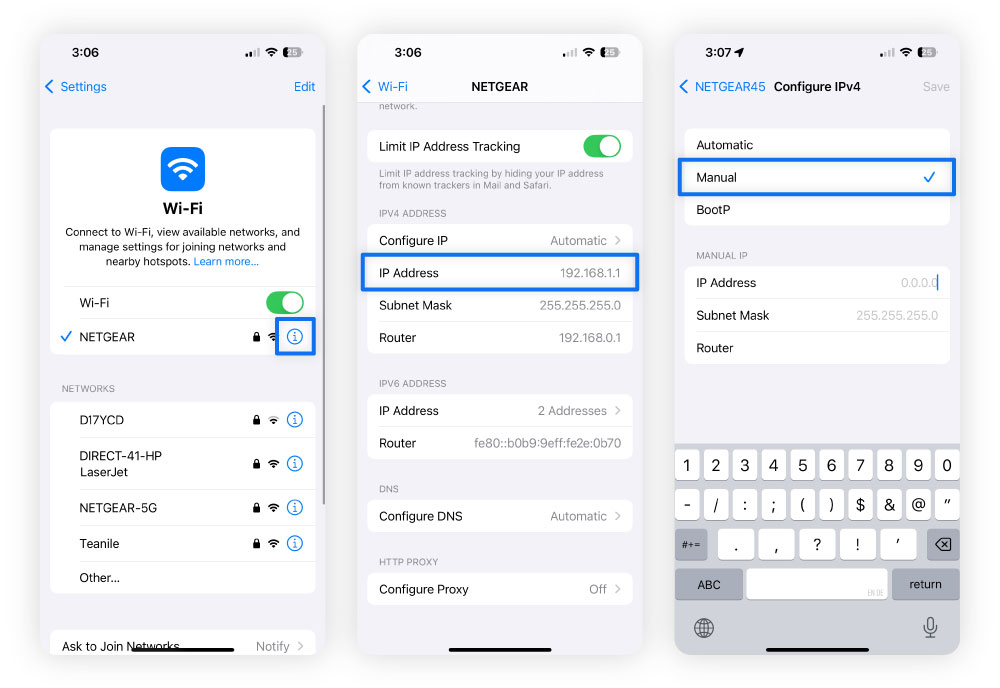
- Navigate to the Settings app, and then tap Wi-Fi.
- Tap the blue ⓘ icon next to the network you’re currently connected to.
- Scroll down, tap Configure IP under IPv4 Address, and then select Manual.
- Under Manual IP, enter your new IP address, subnet mask, and router address. Choose a valid IP within your network’s range to avoid connection issues — you can find this information in your router’s settings.
- When you’re done, tap Save in the upper right corner.
How to change your public IP address on iPhone using a VPN
One of the simplest — and most secure — ways to change your public IP address on an iPhone is by using a VPN for iOS, which can be downloaded as an app from the App Store.
Unlike a private IP address, your public IP — assigned by your ISP — is used to direct internet traffic between your iPhone and websites, apps, and online services. This visibility can expose you to location tracking, targeted ads, and other privacy concerns.
A VPN works by encrypting your internet data and routing it through a secure server, masking your real IP and replacing it with the server’s. As a result, websites and apps see the VPN server’s IP address instead of yours, making it look like your traffic is coming from another location.
Using a VPN can help you:
- Boost privacy and security by encrypting your online traffic.
- Avoid location-based tracking by advertisers, websites, or apps.
- Access content on the go, such as streaming libraries from your home country while you’re abroad.
- Reduce the risk of bandwidth throttling by masking your online activity from your ISP.
Here’s how to use a VPN on your iPhone to change your public IP address:
Step 1. Download a reputable VPN from the App Store
To get started, open the App Store and download a trusted VPN app. Choose a provider with strong user reviews, high ratings, and a clear, transparent privacy policy.
Be wary of free VPNs — many lack key security features or fund themselves by collecting and selling your data to third‑party data brokers.
For the best protection, look for the following VPN essentials:
- A no-log policy: A no‑log VPN ensures your browsing history and online activity aren’t stored, giving you greater privacy.
- A kill switch: A VPN kill switch automatically cuts your internet connection if the VPN drops, preventing your data from leaking.
- IP rotation: By regularly changing your virtual IP address, IP rotation makes it even harder for advertisers and websites to track you.
- Double VPN: With a double-hop VPN, your connection is routed through two servers for an added layer of privacy and security.
- Fast speeds: A global network of high-performance, geo-optimized servers keeps browsing, streaming, and downloads running smoothly.
- Content unblocking: Some VPNs are better than others at enabling access to websites, streaming platforms, and apps from different regions.
With Norton VPN, you can browse anonymously, enjoy content from around the world, and keep your data private. With advanced privacy features like IP rotation and double VPN routing, you can enjoy even stronger protection — whether you’re at home or on public Wi‑Fi. And with a 60‑day money‑back guarantee, you can try it completely risk‑free.
Step 2. Open the app and connect to a server
After downloading your VPN, launch the app and connect to a server location of your choice. This assigns your device a new virtual IP address based on the server’s location, hiding your real one.
With Norton VPN, you can choose from over 100 server locations worldwide, making it easy to access content from different regions and browse privately wherever you go.
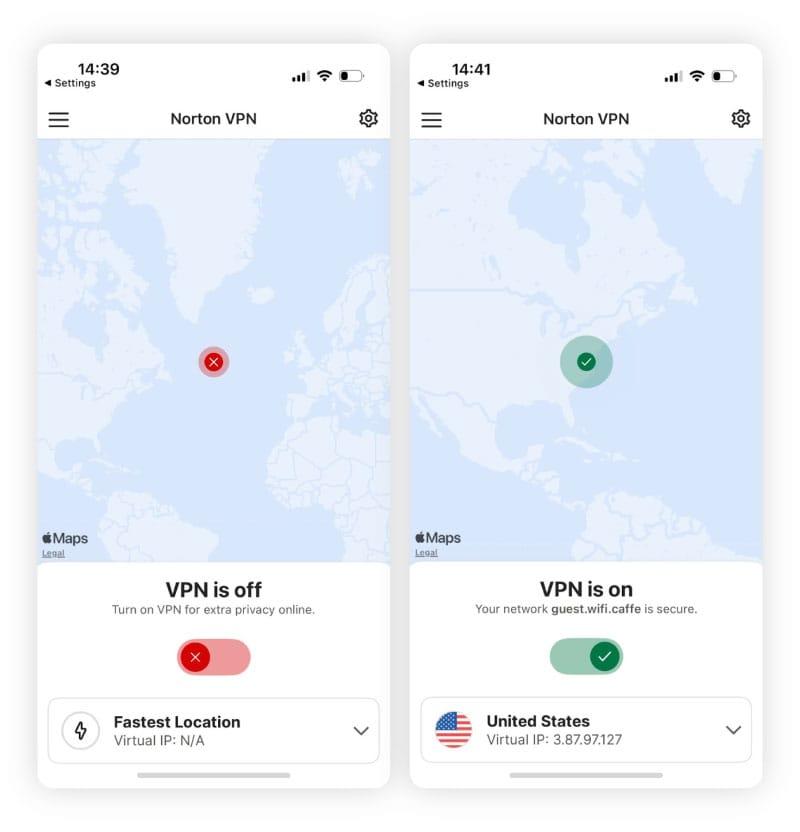
Step 3. Confirm the change
Once you connect to the VPN, you can visit a site like whatismyipaddress.com to confirm your new IP address. It should show the VPN server’s IP address and location, not your actual one.
Change your iPhone IP address with a proxy Server
Another way to change your iPhone’s public IP address is by using a proxy server. A proxy acts as an intermediary between your device and the internet, routing your traffic through a different server to hide your IP address. However, unlike a VPN — which routes all of your device’s traffic through a secure tunnel — proxies typically only work for the specific browser or app you configure them in.
Additionally, most proxy servers don’t encrypt your data, meaning you won’t get the same level of privacy or security as with a VPN. Your ISP, the proxy operator, or others on the network may still be able to see your activity, and your data could be vulnerable to man-in-the-middle attacks.
To manually set up a proxy server on your iPhone:
- Open Settings and tap Wi-Fi.
- Select the Wi-Fi network you're currently connected to.
- Scroll down and tap Configure Proxy under HTTP Proxy.
- Select Manual.
- Enter the proxy server’s IP address and port number.
- To help prevent unauthorized access, enable authentication and enter your login details.
- Tap Save.
If you don’t want to configure a proxy manually, you can use third-party apps like Potatso or iProxy to manage proxy connections on your device. But be sure to choose a reputable option since some free proxy apps may log your activity or sell your data to third parties.
Other ways to change your iPhone IP address
Depending on your network and router settings, your ISP may automatically reassign your iPhone a new public IP address when you reconnect to the internet. You can try:
- Restarting your iPhone: Hold down the power button and volume up button, slide to power off, then turn your device back on.
- Turning on Airplane Mode: In Settings, toggle on Airplane Mode, wait a few seconds, then toggle it off to refresh your connection.
- Switching Wi-Fi networks: Open Settings, tap Wi-Fi, and connect to a different network. Each network typically gives you a different IP address.
Remember that these methods aren’t guaranteed to change your IP, but they often do, especially if you're on a cellular network and your ISP uses dynamic IP addresses. However, unlike using a VPN or proxy server, your new IP address will still be tied to your device and visible to websites, so you won’t gain additional privacy or security.
Method |
Public IP changed? |
Private IP changed? |
Privacy benefits |
|---|---|---|---|
Manual Wi-Fi settings |
No |
Yes |
None |
Use a VPN |
Yes |
No |
High |
Proxy server |
Yes |
No |
Moderate |
Restart your device |
Sometimes |
Yes |
None |
Turn on Airplane Mode |
Sometimes |
Yes |
None |
Switch Wi-Fi networks |
Yes |
Yes |
None |
Why you should change your IP address
Changing your public IP address can help boost privacy, strengthen security, and allow you to access the internet more freely. Here’s why many people choose to do it:
- Protect your privacy: Your IP address can reveal your approximate location and browsing habits. Hiding your IP address, especially with a VPN, helps protect your privacy online by masking your activity.
- Bypass geo-restrictions: Some websites, apps, and streaming platforms limit content based on location. Changing your IP can help you access your favorite content, even on the go.
- Prevent tracking: Advertisers and websites use your IP to follow your online activity. Securely switching IPs can throw them off your scent and reduce targeted ads.
- Connect to a public Wi-Fi securely: Unsecured public Wi-Fi networks can expose your data to hackers. Using a VPN to change your IP address and encrypt your connection adds a critical layer of protection so your personal information stays secure.
While these benefits are valuable, it’s worth noting that changing your IP address can sometimes affect how certain apps and services function. Some rely on your original IP to verify identity or enforce regional settings, which means switching IPs could log you out, limit features, or disrupt performance.
Take control of your online privacy with Norton VPN on your iPhone
Changing your iPhone’s IP address is a smart way to protect your privacy and access the internet on your terms. With Norton VPN, you can do it quickly, reliably, and securely. By hiding your IP and encrypting your traffic, Norton VPN helps you browse, stream, and shop on your iPhone with confidence — no matter where you are.
FAQs
Where is my IP address on my iPhone?
To find your iPhone’s IP address, go to Settings > Wi-Fi and tap the ⓘ icon next to your network. You’ll see your device’s private IP address listed under IPv4 Address.
What happens if someone gets my iPhone’s IP address?
If someone has your IP address, they could trace your iPhone’s general location, target your network with spam or denial‑of‑service attacks, and probe for vulnerabilities in your router or connected devices. They might even sell your IP and other data on the dark web. While not enough to hack your iPhone directly, it can enable more targeted cyberattacks.
What is the difference between a public and private IP address?
The difference between a public and private IP address is that your public IP address is assigned by your ISP and is visible to websites, apps, and online services, allowing them to identify your network on the internet. A private IP address operates only within your local network, identifying devices to each other but remaining hidden from the wider internet.
What is the easiest way to get a new public IP on my iPhone?
The easiest way to get a new public IP address on your iPhone is to use a VPN. A VPN securely routes your internet traffic through one of its servers, masking your real IP and replacing it with the server’s address. This not only gives you a new IP but also adds encryption for privacy and security.
Editors’ note: Our articles offer educational information and are written to raise awareness about important topics in Cyber Safety. Norton products and services may not protect against every type of threat, fraud, or crime we write about. For more details about how we research, write, and review our articles, see our Editorial Policy.


![How to change your location on an iPhone in 3 ways [VPN, App Store & GPS]](/content/dam/blogs/images/norton/tn/how-to-change-location-on-iphone-thumb.jpg)


Want more?
Follow us for all the latest news, tips, and updates.